The processes involved when I make stuff: sculpting, programming, electronics, carving, moulding, etc. Mostly puppets, automata, sculpture, occasionally furniture, interactives, food, etc. Usually fairly detailed and image-led. Please reuse any ideas, tips, thoughts and approaches.
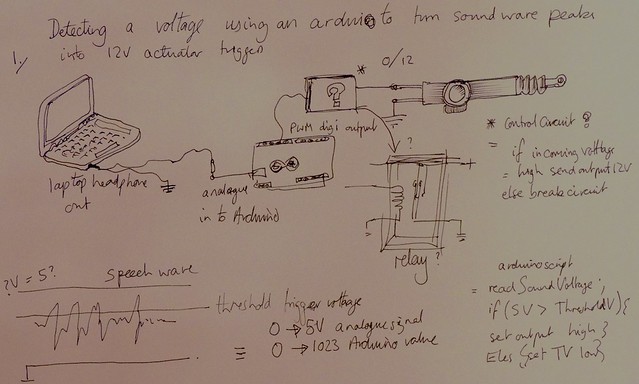
@Twitr_janus needs a voicebox. This will do two things:
Amplify the Processing text-to-speech output from a feeble PC audio speaker to a dedicated speaker in the puppet
Provide a voltage level that is high ebough to use as an analog input to be detected by the Arduino board, to power the speech to jaw motion sync
In the top left photo, is a standard PC audio amplifier rigged up to an iphone as a test source. In the right photo is a standard phono plug, which will provide the output..
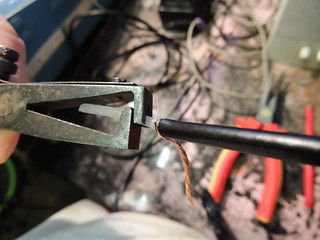
Below left is where is he output plug comes out of the amplifier. The output cable was cut to expose the wires (below right)
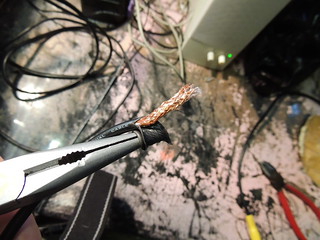
This cable is coaxial. The outer sheath copper mesh is the earth level, with a sheathed inner copper core
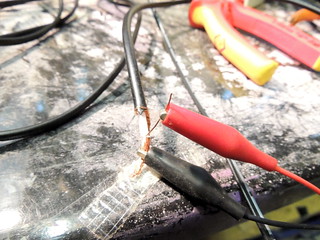
Below left is what the stripped cable looks like. Below right with the oscilloscope lead attached
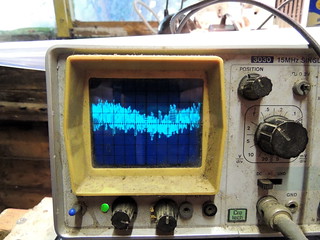
And on the left here is the signal trace. Each square is 1V.
This is what will be used to drive the Arduino. The output which is here driving the oscilloscope will be attached to the Arduino analog input. The Arduino will convert the analog audio level into digital data. In fact a number between 0 and 1024.
The Arduino script will send pulses to a relay if the signal peak is higher than a preset threshold level.
In practise the jaw will trigger to move, if there is a peak speech output (e.g. a plosive B, etc)
This is done in Arduino with a function that polls the analog input, something like this. (This example uses variables that would normally be declared elsewhere in the sketch.)
void jawTrigger () { //
jawTrigger is a function to be called in the Arduino loop()
jawPeakVol = analogRead(analogPin); // turns voltage from amplifier signal wire into a number between 0 and 1024
if (jawPeakVol >= jawThresholdVol) {
digitalWrite (jawRelayPin, HIGH);
// trigger the relay to make the jaw motor move if the voltages peaks above a preset threshold (jawThresholdVol)
} // end if
else if (jawPeakVol < jawThresholdVol) {
      digitalWrite (jawRelayPin, LOW);
// trigger the relay to make the jaw motor return to default rest position if the voltage drops below the threshold
} // end else if
} // end jawTrigger
This is not able to simulate how a real mouth looks when speaking, which will change shape depending on the phonemes in the speech. Here the mouth movement is synced to an audible peak, which the audience will hear as they see movement, and the brain will believe it is speaking the words.
The speaker is stereo. There are two outputs
The PC amplifer has two speaker boxes. One master speaker with an amplifier in it and one slave speaker that is driven by it.
The lead above is the feed from the master box to the slave box.
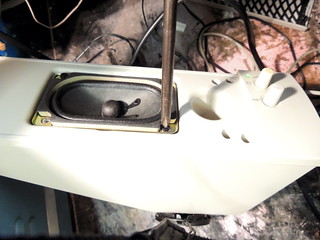
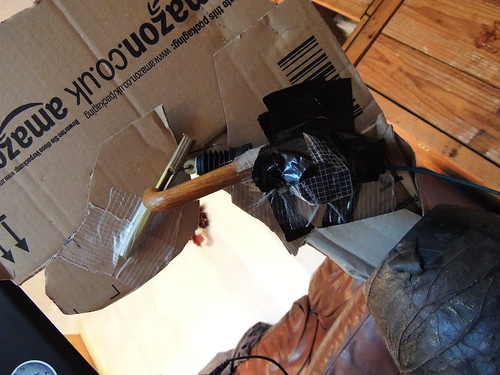
Inside the master box is the speaker that will be the voicebox itself. This was removed from the box, and the box was then cut up to use as a mount
Old long-handled, sheet-metal-cutting shears make light work of even such a thick plastic casing (below left)
Below right is the amplifier extracted from the box
I have finally managed to work out how to get Processing to respond to data live from a Google spreadsheet. The effect of this is that I can send separate multiple packets of data to Twitr_janus from a single source, to control multiple functions.
This is a significant development, as data can now be sent for different functions such as text to be spoken or positioning information for eyes, or other body movements.
I have made a successful test of sending 3 packets at once to the latest version of the Processing sketch (Twitr_janus' brain), which it can decode. These were:
A number that could be sent by Processing to the Arduino, to tell it how to position a control servo for an up/down eyeball movement
A similar number that could be sent by Processing to the Arduino, to tell it how to position a control servo for an left/right eyeball movement
A text string that was successfully received and converted to speech.
Here is Twitr_janus's current voice, speaking data sent from a Google spreadsheet
download: mp3 "This is Twitr_janus speaking thoughts from a google spreadsheet"
download: mp3 This method of getting data from my master means I can speak much longer lines, and not worry about stop characters
download: mp3 "Oh yes! and the sending of other data from the same google spreadsheet works. This means my eyeballs could be made to move."
How Processing gets the data from a remote Google spreadsheet via RSS
Setting up the spreadsheet
A Google spreadsheet was set up to hold the test data. This had three data fields for ENTERING data:
eyeballUpDown (the field name says it all really) - data in A2 in the spreadsheet
eyeballLeftRight - data in B2 in the spreadsheet
text (this is the piece of text used to make Twitr_janus talk -
data in C2 in the spreadsheet
It also had three corresponding for SENDING the data:
eyeballUpDown_stop (the same field name with _stop appended) -
data in E2 in the spreadsheet
eyeballLeftRight_stop -
data in F2 in the spreadsheet
text
_stop (this is the piece of text used to make Twitr_janus talk -
data in G2 in the spreadsheet
The difference between them the data in the entry cells A2-C2 and that in the sending cells E2-G2 by prefixing a control character to the contents of each field. The character is the same for each, and is based on the contents of field D2.
This character was there to be used by Processing to know where to parse the data in the RSS feed. The character can be any SINGLE character, but it must be something that is not going to to be present in the RSS feed output or in normal speech.
In this case the following character has been used: ¬
Making the spreadsheet publish to the web automatically and obtaining the RSS url
From the file menu, choose the "Publish to the Web" option. This make the data public as read only. You can still edit the original sheet and control share rights for edit, but the data is now available to use.
The checkbox must be checked for "Automatically republish when changes are made". This will force the RSS feed to refresh when you type in new data.
You then need to get the url for the RSS feed. Select RSS from the "Get a link to the published data" option, and copy the url.
What the RSS data looks like
The output of the RSS feed will be read as a string that looks like this:
How Processing extracts the data from the RSS feed
The Processing sketch uses a function called getGssData (). Here it is, with some notes about the data extraction using parsing. I have not explained the rest of the function, nor the variable initialisations.
void getGssData ()
{
// uses Google SpreadSheets API to get public tweets from twitr_janus_eyeballs published spreadsheet
gssTextCheck = gssText;
println ("@@@");
println ("[Start Inside printGSS]");
println ();
String [] texty = loadStrings(gssApiString);
The line above is using the Processing function 'loadStrings'. 'gssApiString' has been initialised earlier with the RSS feed URL (https://spreadsheets.google.com/feeds/list/0AgTXh43j7oFVdDJSaHU1ejFqdVRTZU1ZZ1Fabmt2UXc/od6/public/basic?alt=rss)
and loading the raw XML output as a string into an array (texty[])
String [] texty2 = split (texty[0], '¬'); // pulling out data with stop character
The line above is using the Processing function 'split' to break down the feed text based upon the special stop character '¬'. It is creating an array (texty2[]) which will have 5 values in it, because the feed has four of these characters in it, which are splitting the feed string into 5 sections.
The values are:
texty2[0] = contents of everything before the '¬' in cell D2
texty2[1] = contents of everything after that and before the '¬' in cell E2
texty2[2] = contents of everything after that and before the '¬' in cell F2
texty2[3] =
contents of everything after that and before the '¬' in cell G2
texty2[4] =
contents of everything after the '¬' in cell G2
String [] texty3 = split (texty2[4], '<'); // get rid of trailing text after <
The line above finally gets
texty2[4] (= the contents of everything after the '¬' in cell G2) and splits it based on the '<' tag in XML, which is the character that follow the contents of G2. This leaves the text from cell G2 which is set as the variable gssText in the line below: gssText = texty3[0]; gssTextLength= gssText.length();
The lines below do a similar thing to extract the contents out of E2
// @@@@@@@@@@@@@@@@
String [] texty4 = split (texty2[2], ',');
gssEyeballUpDown = int (texty4 [0]);
print ("gssEyeballUpDown = ");
println (gssEyeballUpDown);
println ();
Finally the lines below do a similar thing to extract the contents out of F2
// @@@@@@@@@@@@@@@@
String [] texty5 = split (texty2[3],',');
gssEyeballLeftRight = int (texty5 [0]);
print ("gssEyeballLeftRight = ");
println (gssEyeballLeftRight);
println ();
// @@@@@@@@@@@@@@@@
//print ("texty= ");
//println (texty);
println ();
//print ("texty2[2]= ");
//println (texty2[2]);
println ();
//print ("texty2[3]= ");
//println (texty2[3]);
println ();
print ("gssText = ");
println (gssText);
println ();
println ();
// following lines return the contents of tweet check (last new tweet)
Advantages of using Google spreadsheets to send data
Although this is a similar method as having Twitr_janus listen for tweets, using a spreadsheet has advantages, mainly because there is much more control over the RSS feed format than there is the Twitter API. This means:
Several fields of data can be changed in a spreadsheet simultaneously, by using multi-cell cut and paste. So if the left/right and up/down position of eyeballs needed to be changed simultaneously, this could be done in one paste action.
By prefixing the data in control fields with an unusual stop character, the Processing command that is parsing the text, will not get confused by common punctuation used in tweets. Notably commas and "quote marks", are used by the Twitter API as field delimiters, and these cause parsing issues truncating the message unexpectedly. The Google method eliminates this.
The maximum number of calls in a set time to Google spreadsheet RSS feeds appears to be much higher than Twitter's API. This allows Twitr_janus's brain to check much more frequently (an improvement from about every 28 seconds maximum with Twitter API, to every 5 seconds or faster with the Google feed)
It is probably possible to write a javascript gadget that will write to Google spreadsheet cells in a more interactive way (such as an onscreen slider that writes values to the cells)
This took a lot of coffee and about 7 hours of brainache...
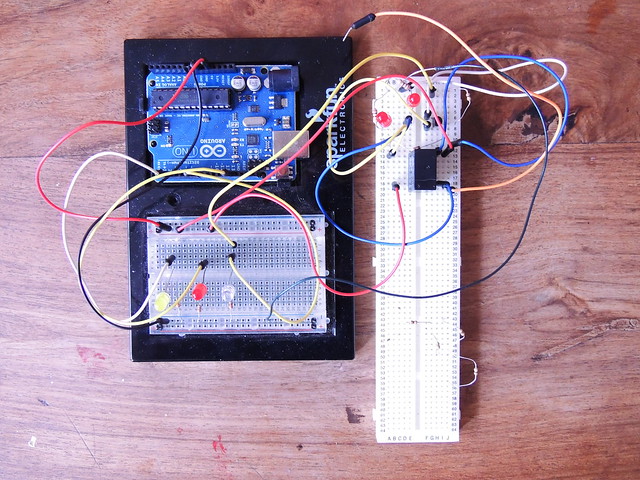
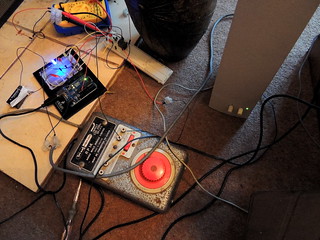
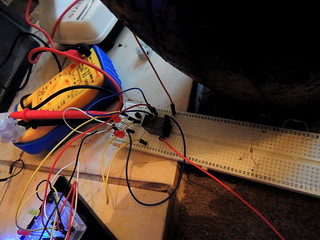
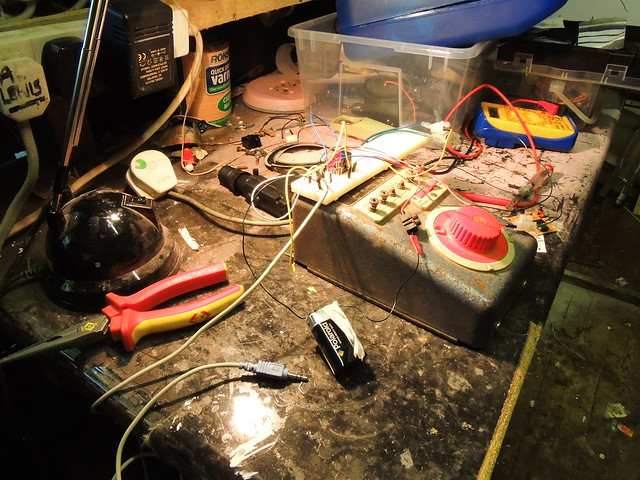
Having got the relay circuit to work on the testbed breadboard, it was time to build it into a unit...
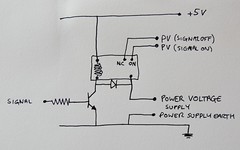
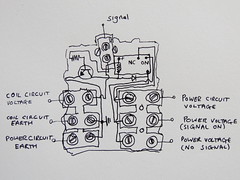
Here's the schematic and the finished board together.
The relay circuit is very simple. This relay uses a 5V voltage to trigger the switchover. The transistor has no current flowing as default, which means the output power voltage is sent to one connector (middle right block).
Applying a signal voltage HIGH to the input, causes a current to flow in the transistor and therefore through the relay switching coil. This changes the power voltage to the alternate relay output pin.
Earthing
There are two separate circuits in a relay. There is a high current power switched circuit, which here is 12V. There is also a coil circuit that switches this power voltage from one output to another. Here the switch circuit is driven at 5V.
The earth of the two relay circuits should be connected or natural differences in voltage levels can cause unexpected problems.
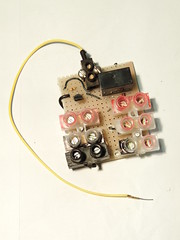
Completed circuit unit
The left hand image shows the circuit in it's final form on the board with connectors. The red indicates power voltages with black as earth.
The left hand connectors are the coil circuit power in, the coil earth and an earth connector for the power circuit linked to the coil earth.
The right hand connectors are for the power supply voltage (top, all red), the power voltage with signal switched on (also all red), and power voltage with signal off (black and red), respectively.
The right hand image shows the underside with connectors and mounting screws.
The top, black connector block is for the signal in.
This unit is now ready to be deployed as required.
Simple example - triggering an Arduino response to a tweet by sending a flag over the serial port.
This clause checks if it is a new tweet:
if (tweetText.equals(tweethCheck) == false)
"tweetText" is the latest value of last tweet from twitr_janus, "tweetCheck" is the last new tweet.
It is doing two things here. Firstly it is sending a message of value NULL to the serial port (called imaginatively "port") which will send it over to the USB connection to the arduino board. This could be done wirelessly in principle.
port.write("NULL")
The NULL character is converted to 0 when it is transmitted as data over the serial connection. The Arduino will start a jaw movement control signal if it detects a signal of value 0. In the code shown, it is simply turning a PIN on and off 8 times, with a 100ms delay before switching between HIGH and LOW, to give a 200ms period..
Adding logic - using tweet length to control the lip-sync signal duration
Using a simple value is fine for an on-off trigger, but the lip-sync should only occur for the duration of the speech generated by the tweet. This will vary depending on the number of characters in the tweet. This can be obtained using the length() method.
tweetLength= tweetText.length();
By sending the tweet length (number of characters) instead of a simple trigger, lip-sync logic can be created in the Arduino sketch running on the board, that will cause the lip sync duration to match the speech audio duration.
The Arduino function is called jawChomper ().
"incomingByte" is the tweet length in number of characters
"chompFactor" is a scaling factor that reduces the character length into jaw movement number. This is because when you speak your jaw does not move for every character. It moves based on words, which are groups of characters.
"chompDelay" is the standard duration in milliseconds, of the alternate HIGH and LOW values of the control signal.
"chompRand" is a controlled randomisation factor. This is added, to cause each HIGH or LOW to vary in duration. This is because the code cannot determine word length, so the jaw cannot be synced to the words. Just turning the signal on and off is not good enough. The brain can easily detect a rigidly uniform rhythm and it will jar. Varying the duration of up and down motion is a simple way to trick the brain into thinking the jaw is in sync with the speech, when it is actually just stopping and start in an asymmetrical rhythm.
void jawChomper ()
{
// this function sets jaw bighting rate for
// read the incoming byte:
digitalWrite(13, HIGH);
for (int i = 0; i < (incomingByte/chompFactor); i++) {
// turn the pin on:
digitalWrite(peakPin, HIGH);
delay(chompDelay+random(chompRand));
// turn the pin off:
digitalWrite(peakPin, LOW);
delay(chompDelay+random(chompRand));
}
digitalWrite(13, LOW);
// say what you got:
Serial.print("I received: ");
Serial.print(incomingByte);
Serial.print(incomingByte, DEC);
}
The voltage signal sent from the Arduino (signal pin here is peakPin - pin 6 as it happens) is connected to the base of a transistor with a resistor to supply a signal current. When the pin is HIGH, the transistor will amplify it to a current high enough to trigger the relay and turn on the power to the motor (not shown here).
When the signal goes LOW, the transistor current will stop and turn of the relay.
Car door locks - they are really rather understated
I am very pleased to have discovered car door lock mechanisms. They are a really powerful means of moving something in a straight line and dead easy to control. I am surprised he aren't as used as servos. A strong 12v locker is about the same price as a pretty small hobby servo. This will drive Twitr_janus' jaws. This video shows his in action....
This video shows a simple switching circuit with a transistor triggering a relay. The input will force a transistor to produce a voltage that is sufficient to cause a relay coil to close a circuit for the door lock motor This combined with an Arduino will convert speech audio peaks into jaw movement = SWEET!
Just discovered car-door lock mechanism which is an awesomely useful device that will push quite a big load from a 12V pulse. This may be the answer to lyp-synched puppet mouth operation via Twitter-to-Text-to-Speech-to-Jaw-Motion!
Nothing like a good Rotring pen for scrawling out circuit ideas
Here's what the motor looks like (it's a bit of a crap photo, off Maplins
Twitr Janus is a remote control puppet head. Previously, the basic means by which to make it to speak was established. This will work by enabling it to listen (via a Processing sketch) to tweets from the @Twitr_janus account on Twitter. The tweets will eventually get converted into spoken sentences using text to speech.
and so onto hearing and vision...
To get sight requires an eye. In this case an HD video camera. a cheap one will do, but this was handy for testing. A lower res camera may actually be more desirable to keep a fast connection and make it reactive. This one has a decent microphone too, which is harder to find. It is likely that this will be used, but with the video streaming settings set low, but the audio high.
Various possible options were considered to enable streaming of video and audio from the remote head to a control PC elsewhere. These included:
Google hangouts but this is aimed at socialising, and can't be easily activated remotely.
running a mini server with a/v/ streaming, but I couldn't be bothered to work out the security/ firewall/port settings.
a plug and play IP or ethernet webcam, but this was not proven and would need to be bought before testing.
In the end, after some trawling discussions, it occurred to me that Skype might work. This proved to be rather useful because:
it can be set up to make a video and audio streaming connection really easily
it can run in the background, and be activated remotely by calling it
security is handled by the in-built privacy settings and by creating controlled accounts for Twitr Janus and a controller, which can only access calls by each other
once account access is restricted, the connection can be activated remotely by the controlling account by setting the slave account to automatically connect (set in Skype)
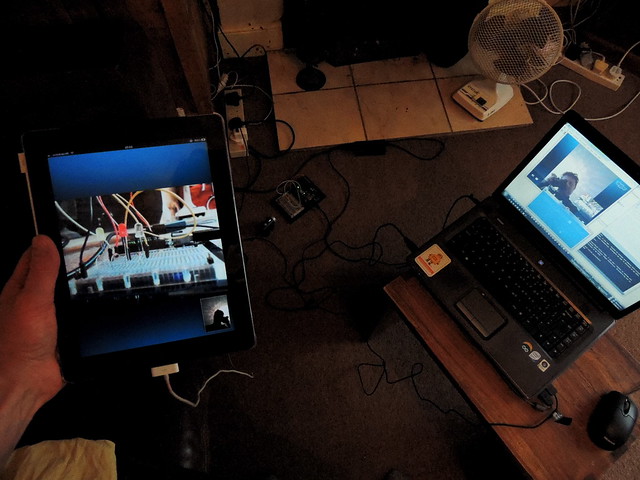
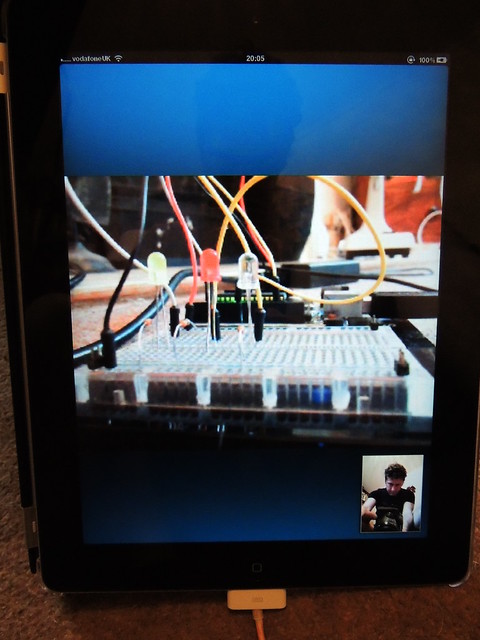
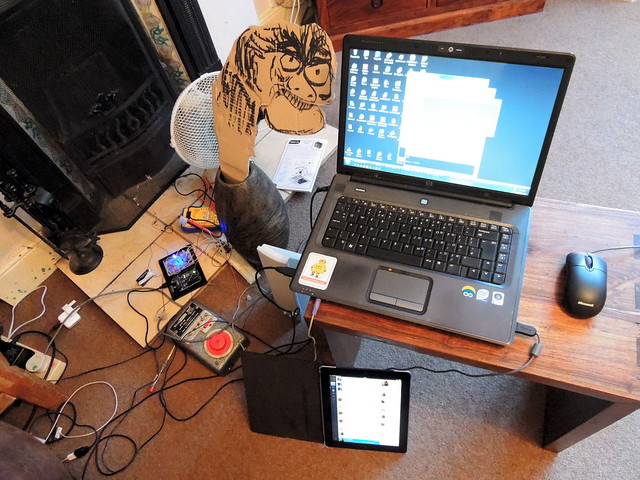
Here is a prototype of the communication technology components, joined up to demo the following:
it is possible to start the video/audio link to enable Twitr Janus to see and hear (by calling on Skype - the slave account on Twitr Janus control PC would need to be in tray mode)
it is possible to respond remotely to someone talking to Twitr Janus by tweeting the response to the @Twitr_janus Twitter account which will eventually be converted to speech
and so...
The iPad (master):
the controlling device here. It also could be a phone or laptop as the Twitter and Skype services are web based (or app based if needed)
The laptop (slave control PC):
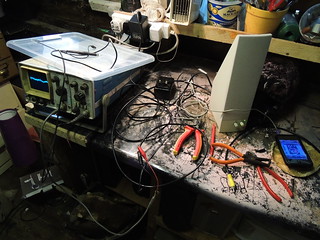
has the web cam attached pointing at the Arduino board.
has Skype running streaming video and audio from the webcam over the Internet to the remote master control (iPad here)
has a Processing sketch running which is listening to Twitter and sending data to the Arduino if a new tweet from @Twitr_janus has been sent
The arduino:
Has the Firmata for arduino library loaded, which is making the serial connection possible to the Processing script, and hence to Twitter
Has an LED indicating when a tweet has been received
very satisfying!!
Close up of the eye watching the response LED indicating that a Tweet has been received!
This is a "design" and I use that term loosely, that is an attempt to make a real head speak out tweets, from anywhere in the world - a sort of remote Twitter-to-speech-convertor!
To make this work there are a number of challenges, which include:
Connecting the head to the web, ideally remotely using wireless
Once connected getting the last tweet from a specific Twitter account (the control account)
Converting the tweet into speech
Making the speech signal animate a mouth to simulate talking
This is visualised above!
The step for getting the last tweet from a twitter account
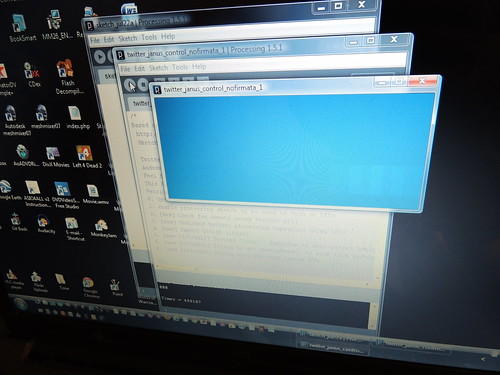
Step one of this I appear to have solved in Processing (which is Java-based), which should mean it works in arduino.
Here's a snap shot of the function and the output that it can produce.
It's calling the Twitter API, then parsing it and splitting it to create an array, then calling one element of that array, which is the last Tweet from twitter.com/rosemarybeetle


 The PC amplifer has two speaker boxes. One master speaker with an amplifier in it and one slave speaker that is driven by it.
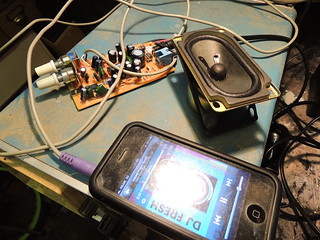


 Link to this on Maplins