Here is a wooden fish on legs...
A dancing fish with a woman in it, in disguise. Sounds like vintage Angela Carter, but 'twas in fact the first time I properly met my friend Louise.
That is, she was dressed in an endearingly crude fish costume bobbing about at a children's festival. To be fair, I was dressed as a lobster, so no judgements here...
Anyway, some decades later, I made this as a 50th birthday present. Happy birthday, lovely Lou!
Here's the fish.
Design
I did a David Hockney on this. It's a composite image taken from screenshot stills from a YouTube video. Thanks Photoshop.
I got this up on the phone to use as a guide.
...to make the sketches for the shape.
I did these on the white board in the shed, so they were right there to look at while carving. I added a front view on this, because the fish itself needed to be 3d, whereas the piccies are flat
Build
This is the block from which this was carved. I chopped this off a log.
To be honest, I don't really know what wood this is. I got it from a waste wood pile of a tree surgeon. It has quite a stringy grain, so I think it is willow, but I can't be sure.
The first thing to do was rough out the basic shape. For this, I started with the end-on profile. It is important to get the block shapes made before thinking about details. I just drew the profile on the end of the block with a marker pen.
Then removed all the waste with the Arbortech.
Here is one side, about halway through...
... and end on.
Almost done.
The Arbortech doesn't allow much more subtlety than this, so at this stage I didn't worry about smoothing. It wasn't the right tool.
Here is the block after some smoothing down with a rotary burr in a die grinder
With the rough block shaped in its end-profile, I could draw the fish onto its side-profile, using the "design drawing" as a guide...
In close-up.
First the outline was cut out in side view by trimming off the waste round the lines. You can see this at the tail end.
The shape up until this point is only correct from the side and the front.
After this, I needed to refine the 3d shape and form all the continuous angles between the two planes on which the drawings were made. You can see this at the head end.
I've missed a few pics of the rougher shaping of the form, but you get the gist.
Next, all the details were carved out using micro-burrs in the Dremel.
Here, I'm cutting the curve of the gill line. The eye socket and the spines of the fin have already been roughed out.
The broader forms were shaped partly using the filing sander. In this shot, you can also see that I screwed a cuboid block onto the base of the former block, so that it could be held easily in the vice.
The subtler curviness was teased out using the die grinder with a rounded cone shaped burr...
...and even more subtly teased with the even smaller burrs in the Dremel.
Here are the various tools used.
Most of the curvy shaping is done using rotary burrs.These are super-hard tungsten carbide files.
Rounded burrs in the die ginder are used for forming shapes at the scale of a finger...
This one looks the same, but has a slightly coarser cut
The really pointy round cone allows you to get right into the detail

There are also microburrs for the Dremel, for really tiny details...
The filing sander. Depending on the coarseness of the belt, this can be used in different ways. With a rough 40 grit belt, it can be be used to grind off waste fast. With a 120 or above grit belt, it can be used to subtlely smooth curvy surfaces, especially convex contours.
Finer sanding needs sanding pads in multi-tools...
A more pointy one
Variations of these steps were repeated a lot, until the smooth shapes emerged. Then there was a lot of hand smoothing with various grades of sandpaper...
Although carving the form needs the most attention, smoothing the carved shape down takes much longer. This involves repeatedly sanding with sandpapers of decreasing grades of grit.
I started with 80, then 120, then some 160 and some 320. Eventually some fine wire wool.
Most planes can be done with the sander pads. These are squidgy, so they can be moulded into low profile concave faces as well as convex faces.
Finger attachment is slightly smaller.
Sometimes you have to just use your fingers for this...
And so on and so on...
...until the final smooth shape was brought out of the block. This takes a lot of of forming and rubbing, obviously.
One thing to note - the way to judge if you need to keep going is to fondle the piece.
The objective is that, as a physical object, it should feel agreeable smooth to run your fingers over it. This requires touch, not sight.
Here it is, more or less finished, against the design...
In close-up.
Fom the front.
Colouring (part 1)
The fish shape was more or less done, so now it needed colour.
The original fish was pretty colourful...
For this I used artists inks as a wood stain. They contain a little shellac (lacquer), so they both stain the wood and start to create a patina on it.
This one is yellow...
...used for the yellow tail...
...and side fins...
Nice
Feet
So far, so fish.
Before finishing off the colouring, I made the cheeky legs poking out the bottom of the fish.
For this, I used an elm offcut that was lying about after I had been chopping logs...
One piece was conveniently sufficient for both feet. First I scribbled some shoe designs on the wood.
Then, I chopped it in half to make two formers.
Et voila.
I trimmed these down based on the the plan view drawing as an outline, using the conical burr in the die grinder.
Then I carved shoe-shapes freestyle, with the Dremel using the microburrs.
At this small scale, the fibres in the grain of the wood were quite easy to snag, leaving the shape pretty rough.
I smoothed this down and finished the fine contour-shaping with the filing sander. It is easer to do this by holding the work, rather than holding the sander. You just clamp the sander in the vice and sand against it.
Two stages of carving:
Left - after Dremel carving, but before sanding
Right - after die grinder shaping, but before Dremelling
Close-up. About 1cm across
Two feet ready to trim off the waste
Here they are still attached to the waste wood...
From the front.
Finally, I cut off the waste wood...

I also had to clean up these rough ends from the saw cuts

Next I made some "legs", which were just cones of elm, shaped on the filing sander.
I made them a bit calf-shaped, but didn't spend too long on this.
Once shaped, off they were chopped.
Next I driled holes in the shoes to take the legs.
First, a thin pilot hole to get the hole centred exactly where I wanted it. This is hard to do with the larger drills without a pilot hole. Easy with a tiny drill.
The tape on the drill bit is a depth guide, to allow me to drill the right depth of hole and not just drill right through the shoe.
You can see it flapping about in a blur when drilling..
Once I had a pilot hole to the right depth, I used the final gauge drill bit to ream out the hole to the final size.
Because of the pilot hole, the larger bit cuts easily. It cuts centred on the pilot and so doesn't veer off ruining the work. It also cuts to the right depth. You can feel the resistance when it hits the bottom of the pilot, so I knew when to stop.
A spot of glue.
They wedged in nicely because of the conical shape.
Hey Presto - two dismembered legs with shoes...
For fitting the top of the leg into the fish, I needed to cut a rebate all the way round the top of the legs. I marked them with a pencil.

Then cut to the desired depth of rebate with my fine toothed tenon saw, clamped in the vice. It is easier and safer to clamp the saw, than trying to saw round a tiny leg clamped in the vice.
Two legs with rebate guide cuts.
The waste of the rebate was ground off using the filing sander. Again, with the sander in the vice and the work applied to it, not the other way round.
Rebates cut. Ready to fit
Before I could add the feet, I needed to take off the block I used to allow me to clamp the work in a vice
I cleaned up any rough edges with the Dremel.
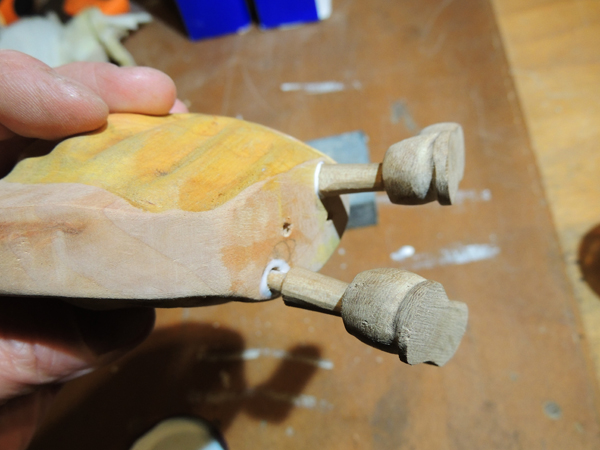
Then I cut positioning holes in the bottom of the body of the fish...
...to fit the legs into.
Both in place, but not glued, so could test if the fish could stand up OK on them.
Yes, it could!!
Once I had checked the foot-orientation that worked, I glued them into the positioning holes in the fish.
Thus...
The build was finished. Looking good
Colouring (part 2)
Build done, it was back out with the artist's inks.
Green ink for the highlights on the fish bones.
Nice.
Then the blue base coat for the body. The ink looks too dark when applied, but it lightens when it dries.
The body all done.
For the eye sockets and the shoes, I used white radiator enamel paint from a spray can.
I sprayed it onto a palette (a bit of cardboard!) and daubed it on from that.
And applied about 4 coats. Enamel dries really fast, so this didn't take long.
Some time later, the blue body had dried to a much lighter blue. Then I could paint on the spots.
Although not shown here, I also used black enamel paint to colour the eyes in.
Final finishing
To give an even tone all over and a high sheen, I French polished the fish.
This is a naturally amber coloured shellac finish, which gives a beautiful top coat.
You just rub it on and it dries in about 15 minutes.
It did make the colours a bit greener.
I used three coats. Between each one, I gave the surface a light rub with steel wool to take off any dust blemishes and leave the surface super-smooth.
Then finger on another coat etc.
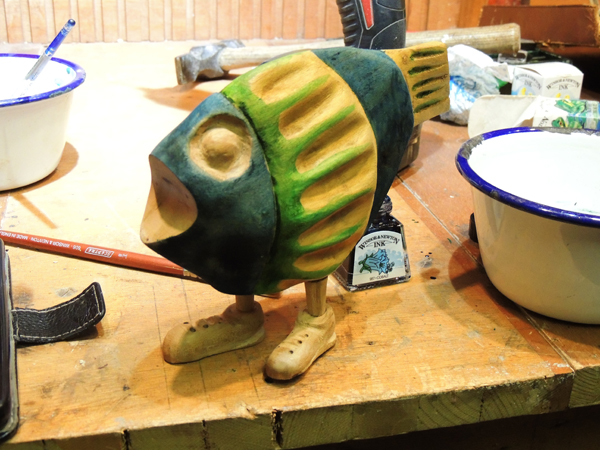
From the front, it's quite a happy fish.
Finished!