I thought I'd make some.
Here is the first attempt - not bad. This is a take on the classic "roughing out" gouge. This is the tool used at the beginning to hack off the wood fast to get a basic shape.

It is slightly different to a traditional roughing gouge in that it has a convex edge form (as seen from above) as well as a concave blade (as seen end-on). This will allow me more flexibility to build different shapes when getting a piece of stock wood to a roughed-out shape.
The blade is a rock-breaking bit from a pneumatic drill, the handle is walnut from logs scrounged of my dad and the ferrule is a section of steel sawn off my dead folding bike.
I quite like it's chunky feel. It's a bit rough but I quite like that. The only thing I'm not sure about is using walnut for this. Its a bit of a bland grain and shows a tiny split, but it was made from a green branch log, so that is probably not allowing it to season slowly enough.

Here is the under side of the gouge...

And another view from the top...

A nice chunky and very strong blade

I like the colours of the steel - note, it hasn't had the final bevel of the cutting-edge ground and honed yet.

This is the original steel stone-breaking chisel that the blade was made from. I can't actually remember where I found this. It was a lost soul discarded somewhere.
It's about 16" long and 3/4" thick.

Making the handle
The handles here were made from green walnut logs my dad passed my way (cheers)
Here is a shot of a branch of the size used.
Next to it and another one that has been turned to make a handle. You can see a bit of the original branch log still attached

Ditto

To turn it, a plate was attached with four screws, into the log. This was previously a brass door knob plate bizarrely found in a the remains of a fire in a wood, while walking the pug. Hey ho. stick a bolt in it and off we go.

This was popped in the lathe with the face plate held in the chuck of the drill that powers it.

The first turning was roughing down to the right diameter. This is easy enough, but a little tedious. In fact this rough shaping is exactly the job that the chisel I am building here makes easier and faster. In this case I was using regular joinery chisels.

The walnut was quite green and was quite feathery when roughed.

I was making several handles which would be for a matching set of chisels, so I used calipers to check the diameter was consistent. It was nice to find a use for these. I hadn't used them for decades before this.


After shaping there was a lot of sanding to get a good smooth finish. This was done in several passes using 120 grit, then 240 grit, then 320 grit and eventually 600 grit

And then finished with wire wool for a super fine finish. This really does make the difference

Here is one of the handles fresh off off the lathe...


The charring on the end seen below, is where the centre spur (the spiky thing that the wood revolves around) rubbed on it. The spur can get really hot. I burnt a finger on that quite badly which was educational.

I then just needed to remove the wooden waste tenon from the end that the face plate had been screwed into. I did this in the vice with a hack saw for a fine cut.

Interlude
While making this, I had the sprinkler on to soak the lawn. Worms don't like this and come up to the surface to avoid drowning - oops - bad error. The father bird of a pair of local blackbirds is rather keen on pulling those out.
Making the blade - part 1 - Making a swage
A swage is a specially shaped block used by blacksmiths to work red-hot metal from the forge to go into a specific shape. In this case it was needed to create a consistent curve to the underside of the gouge when forging it from the original stone-breaking tool.
Here it is in place in the hardy hole on the anvil.
Here it is in place in the hardy hole on the anvil.

And here is a close-up. It's just a block of iron into which a concave profile has been ground. The spur is to anchor it in the anvil's hardy hole.

This is the original block of iron it was made from.


The die cutter for fine grinding and the filing sander for final smoothing and polishing.

Here is the initial grinding out in progress

Which starts to look like this eventually...

End view...


An original block next to the shaped one.

Note, I have used a wooden peg to keep it in place

Making the blade - part 2 - Forging the blade
The steel for these chisels was made from a stone-breaking tool from a pneumatic drill. Here it is, just about to go onto the barbecue.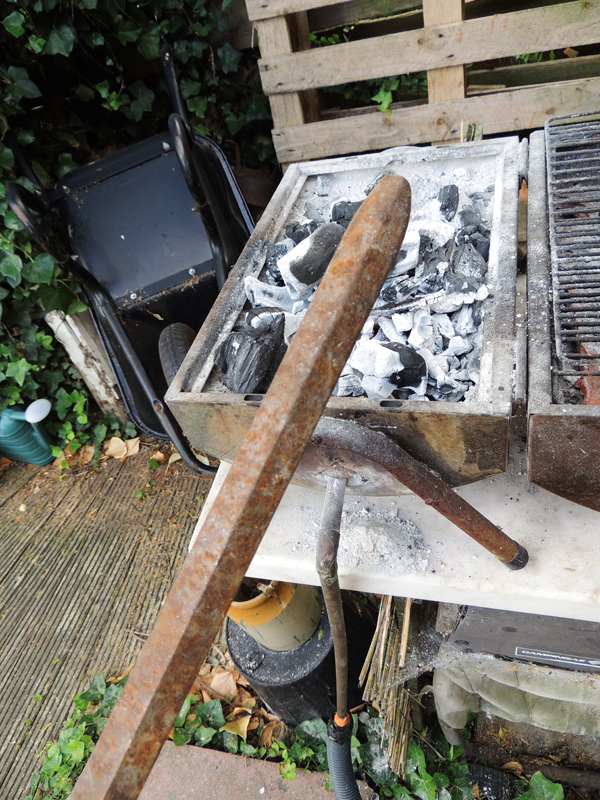
Of course, on its own the BBQ is nowhere near hot enough to get steel up to red heat fast enough...

Cue the hot air paint stripper!
This provides more heat, but mainly it is there to create a sufficient blast of air to make the charcoal burn much faster and hotter.

Some bricks were also added to contain the heat, making it more efficient


I haven't got any shots of the forging process, but essentially it involves heating the steel bar to as close to white heat as possible then beating the crap out of it with a heavy blacksmithing hammer
Once a flat blade shape had been formed, the flat shape was beaten into the swage to get the nice smooth outer curve.
Although the side that is in the swage is quite smooth, the inner face where the hammer it is less so. Here you can see the hammer blow marks. This doesn't matter. They get ground out later


The raw blade has no tang (spiky thing that fits in the handle).
This was ground out by hand. This took quite a long time. Here it is, half done

The front of the blade also needed shaping to give it an even profile. You can see this here (and the tang which is much sleeker in its final form)

The smooth metal was achieved initially usinf tg die grinder for minor final shaping, but mainly the filing sander for really grinding it all smooth.


Heat-treating the blade
Before the chisel could be put together, it needed hardening...
This can be done by heating to red hot or higher...

Then quenching in cold water. The rapid cooling makes the steel set in a strong physical structure, making it much stronger.

steamy...


Fitting the handle
Once the blade was finished, it was time to pull it all together.
All good chisel handles need a ferrule to stop the tang of the blade splitting the wood of the handle.My poor old ex-bike had yet another part recycled. This time a short section of steel tube to make the ferrule.
Here is a test fit to see that the blade fitted properly and in line with the handle with its ferrule fitted.
