And so, here are some reflections on factors that affect roasting those delish starchy tubers.
Spuds U Like
This sort of thing is what we are aiming for here. Golden, crispy crusts with creamy fluffy interiors. nom nom nom....
All potatoes are not the same
First - start with the right variety. This is the most important thing. Potatoes might look similar, but they are not. You want ones that will tend to fall apart and go fluffy if boiled.Don't expect something labelled "white potatoes" to work. And of course, new potatoes will definitely not work. They are variety that will not go fluffy. New potatoes are not just young potatoes, they are varieties developed for their waxy texture and they don't fluff up. The fluff on roasting varieties is what the fat needs to work on. The starchy fluff gets cooked in the hot fat to make the crust.
Here, we have Maris Pipers. These are excellent for roasties. King Edwards are also very good.

I have a theory that older stored spuds make better roasties than freshly dug ones. I haven't proven this, but they are dryer and I suspect starchier.
Anyway, you can use any age spud, from going-green to freshly white, as long as they are the right variety.

Start with your water
The first thing to do is get a pan of water boiling. Do this before peeling, as the water takes 5-10 minutes to get hot. In the time it takes to get the pan of water boiling, you can peel the spuds...
Not much to say, here really - just peel the spuds, making sure there are no green bits left. Green bits are mildly poisonous.

If the skins are not green, you can cook them too. Here, I'm not bothering, but they are quite good fried or roasted.

Eventually, you'll have a load of naked spuds like this...

Chop them so they have even flat sides
Although there are theories about chopping spuds with lots of angles to increase the crispiness at the corners, I'm not convinced. I think it is easier to manage the turning and evenness of browning if the cut potatoes have two flat sides.And so, when you have a spud like this...

...it is best to chop it into flattened slices thus...

If you have really big spuds, you can chop them in half first...

... then chop the two halves into slices, again with flat faces.

By the time you've peeled and sliced your potatoes, the water should be boiling...

Pop 'em in...

And boil for about 10-15 minutes. It is most efficient with the lid on, but the starchy water does tend to bubble up and leak out. You usually need to turn them down to a simmer.

Once cooked strain off the cooking water. In this case, I wasn't using the water, but if you are making gravy, keep the liquid. It has flavour and starchy goodness.

The spud pieces will now be cooked and very fluffy on their surface.
Inside they will be almost-cooked and solid in the middle. There is some leeway in this, but if underdone, the spuds won't absorb as much fat and won't be as crispy.
Overcook them and the whole lot will end up as a mushy mess. The latter will still roast, but it is a bit like roasting mashed potato. It takes a lot longer due to the water creating steam as they cook. They also obviously have no real potato shape!
This is what they look like when they are about right.

Close-up you can see the fluffy exterior starting to crumble, ready to absorb the roasting fat.

Add fat
For roasting, the potato pieces are cooked in a fat of your choice. Generally I use cold-pressed rapeseed oil. This is the healthiest oil (high in omega 3 and omega 6) and critically has a very high smoke point. This just means you can cook things in it at a very high heat without the oil burning and ruining the flavour. A really tasty alternative is any hard animal fat like pork lard, beef dripping or goose fat. These are really the best for roasting spuds, but obviously they are not the best for your cardiovascular system.
Line the pan with your fat. You don't need to add loads yet. Later on, the fat and juices from your roast meat get added to add flavour. Firstly, you just need enough to get them oiled up to stop them sticking to the metal tray.

Pop your par-boiled spuds onto the fat...


With a spatula, gently turn the pieces so they all have oil soaking into the fluffy outside. This is important. If you don't, you risk getting tough dry exteriors.

The golden colour is from the yellowy rapeseed oil.

At the same time, get your meat in the oven. In this case, it's chicken. It is traditional to put the spuds in with the meat, but it is much harder to manage the cooking times for potatoes and meat, so I cook them seperately.

In they go...
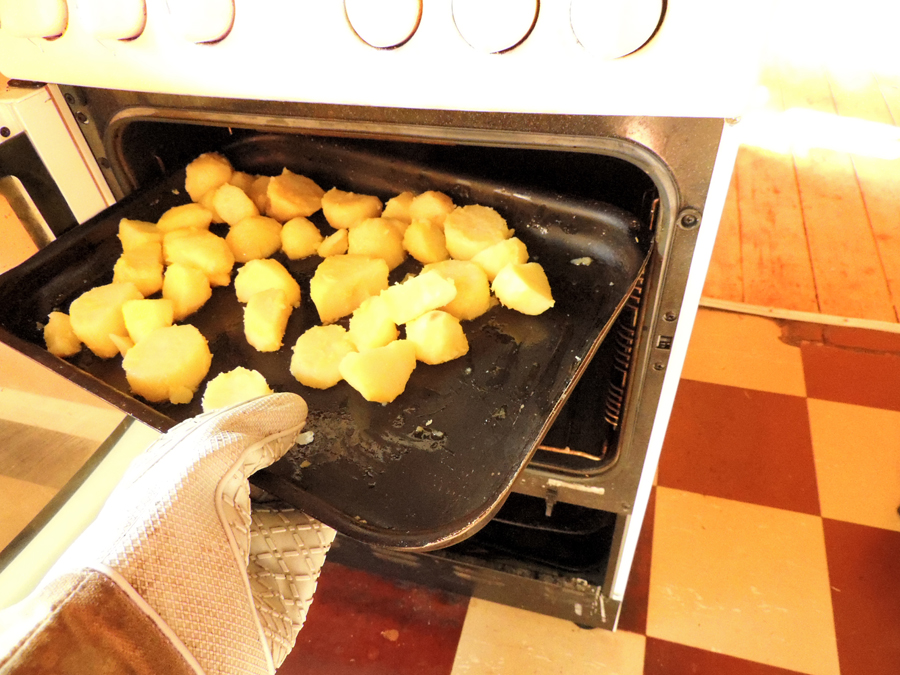
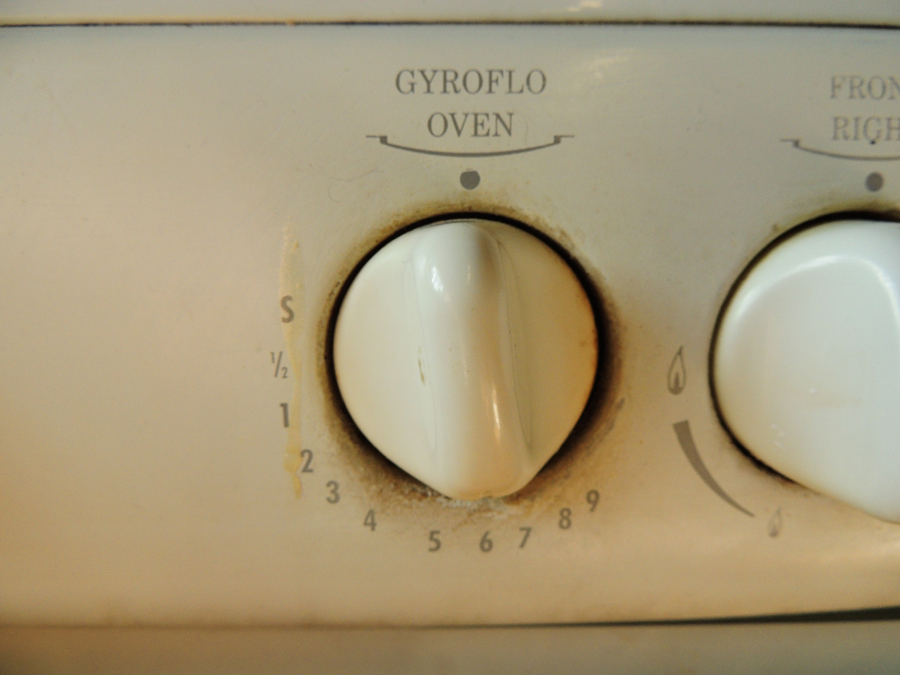
Initially, they don't need to be any hotter than gas mark 6, which is 200C or 400F. Later the oven temp is made hotter, but not until the end.
Check regularly, especially at the beginning
The potatoes need turning periodically to keep them evenly coated with the fat. This is essentially basting them. Checking regularly at the beginning most important. At this stage there is not enough fat to pour over them. Just enough to stop them sticking. Add more if the spuds are looking too dry.
Basting is easy to manage if you have flat sides and you can just flip them all onto the opposite side every now and then. This is why you don't cut them with irregular angles. It is hard to turn them evenly if they have odd angles.
This is what the spuds look like after about twenty minutes. They are slightly crispier as they cook in the fat.

Note the underside that is resting on the fat and touching the metal pan will go brown much faster that the side, so you need to lift them to see how they are doing.


You should turn them over every 10 minutes or so as they start to brown, so that they cook evenly.

After about 30-40 minutes, the juices start emerging from the meat too. This chicken is just starting to brown. At the beginning I normally have the meat at the top of the oven and the spuds below. Later on this is reversed for the final browning.

Lift it up with a fork to let the juices out...

Just keep checking now and then
About 50 minutes in the spuds are starting to brown more obviously. This process gets faster as the cooking goes on. This is because early on the potatoes don't brown because of steam stopping them get hot enough. As the water gets driven off by the roasting the browning will start to get faster.
Keep turning them

The brown one has just been turned over...

More flavour
About an hour in, the meat juices start coming out faster...


Here, you can see the meaty, proteiny juices at the bottom and the fat on the top. What you need to do is try and get as much of the meaty juice out of the meat pan and transfer it to the potato pan.


This is about 1 hour 15 minutes into the cook.

You need to check the bottoms aren't getting burned and keep turning.

About 90 minutes into the roast, the potatoes should be swapped to the top of the oven. The meat will be more or less cooked through and should be placed lower in the oven to finish it off without drying it out.
At this point, you turn the oven up to full blast (gas mark 9 or 245C/475F)
This stage needs your attention every 5 minutes or so.

After 5 or 10 minutes at high heat, the spuds will be golden and crisping up fast
Keep turning them!

Finally, if you want extra flavour, now is the time to add it. Here is crushed garlic. This can't be added any earlier or it will burn long before the spuds cook.

Use the spatula to coat the spuds evenly.

And add a bit more juice. Do this in small amounts so as not to wet it too much or they can go soggy.

Here are the finished spuds (with cheating pre-cooked Yorkshire puddings from the freezer!) The final high-heat browning took about 15 minutes to get them to this colour and crispiness. You have to judge this by eye as the timing varies depending on what type of oven you have, what else is in the oven (mainly because meat steams), etc.
Look at these babies...

Nom nom nom....

Close up money shot...
