Saturday 11 January 2020

Converting a dead elm tree into timber

This post is about making wood out of a tree, or "conversion" as it is known.

In the words of Blurt:

The tree is dead. 
Long live the tree!

Back in 2018, our elm tree died. This was a shame. When we moved in, it was a good 20-plus feet high, leafy and alive. But the rot was already there and the long hot summer finished it off.

So, I chopped it down...


I was determined to use the wood though. It is not often you get your hands on elm and it is a lovely strong wood. First off I hacked off all the branches. These were surprisingly tough to detach and some of them needed the chainsaw, instead of just a machete.

The branches were later cut up for kindling, really good kindling. Elm is quite dense so it has plenty of calories tucked inside it and doesn't spit when alight.


There were two main trunks (elm is a hedge tree that throws up suckers, so can multiple "trunks").

After de-branching, the main trunks ended up looking like this.


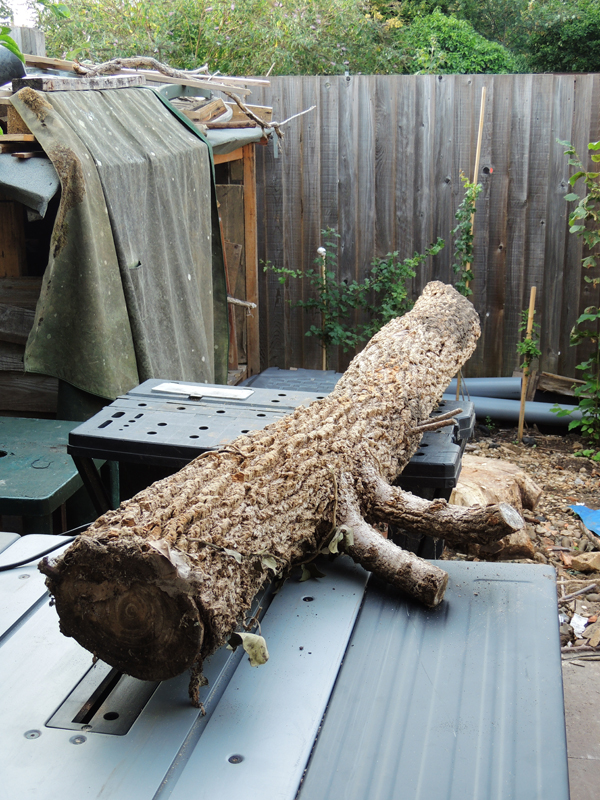
I wanted to make full-length pieces, but due to the bend in this trunk, I decided to cut it into two parts.


The bark came off easily with an adze. It was loose from the disease that killed it.


Elm bark beetle tracks from under the bark. The beetles don't kill the tree directly. Their tracks allow a fungus to spread under the bark which causes the tree to block off affected cells. But, in doing so this starves off water and nutrients from higher areas of the tree, ultimately killing them. Sad face.


The bark really just flakes off.


Here is one trunk, with the bark off. It had a pretty big split in it, it transpired.


The next job was to rip the log down lengthwise into planks. Ripping just means sawing down the length of the tree, as opposed to cutting across it (hence, a rip saw is for cutting lengthwise; a crosscut saw is for cutting across.)

Commercially this is done with massive circular saws or massive bandsaws. I had neither, only a small circular tablesaw.

The log was long, uneven and heavy. It was not going to be safe to try and cut it on the table saw.
To make it easier (and safer), I first planed one face flat with a power planer.


This allowed the flat plane to ride over the table. Without doing this, the log would roll about and put loads of strain on the saw bearings.


I've missed off a few shots of the rounded outer pieces being sawn off here. Here is the middle piece of the trunk being sawn on one side.


The saw blade cuts only to a depth of about 55mm, which is about half the thickness of the piece I had, once squared off. This meant I had to turn the piece over and saw through on the other side in a second pass on the table saw. It is not easy to do this perfectly in alignment. You can see some dodgy saw blade marks where one second pass was not quite cut in the same vertical plane as the first pass.


But, hey  - I ended up with some quite nice chunky thick planks of elm.


Here are some of the planks.

Of course, they needed to be seasoned after this. Essentially the trunk is full of sap or otherwise wet and needs to be left for a long time to dry out and stabilise.

The logs themselves were seasoned whole in the shed, from when they were cut down in October 2018. They were sawn down into planks in four months later in January 2019. The timber from them was not used until a year later in January 2020.


Thursday 9 January 2020

Bowl making

Here's a bowl I made.


Raw materials

This beauty was hewn from a lump of elm. I converted this timber from the trunk of the old dead elm tree that was in my garden.


I just sawed off a hunk of it. Because this came from quite a small trunk, it had quite interesting grain. It has a knot in it too, which adds to the variation in grain pattern.


Before I could turn this in the lathe, I needed to add a face plate. This is a circular plate with a perpendicular spindle attached. The plate is screwed onto the work piece and the spindle is held in the chuck of the lathe. I didn't have one, so i made one from this old wall mount. It was originally a bracket for holding a handrail for stairs


I cut off the 90 degree bit of it with the angle grinder


Et voila...  The face plate is the left hand bit.


I then attached this to the untrimmed block of elm wood.
Note, you need pilot holes for the screws to avoid stressing the grain and potentially splitting it


Here it is attached with three 20mm screws. The block itself is about 55mm thick. About 15mm of the screw bodies are actually in the wood, with about 5mm proud of the wood because of the thickness of the faceplate. This meant I could hollow out to a depth of about 40mm without hitting a screw


Next, I needed to cut the square block to a roughly cylindrical shape. This makes turning it much easier. I used a handy roll of masking tape as a template to draw cutting lines. It just happened to be the same diameter as the narrowest width of the block.


Here is the block marked with the cutting lines...


With the block held in the vice, i sawed off the waste up to the edge of the circular cutting line with a circular saw.


The trimmed block...


The block could now be fitted into the lathe.


I've missed a few shots of shaping the outer bowl shape, but it was chiselled.

Here, I'm using a long thin chisel to cut into the centre to form the bowl shape. Note, for stability and safety, a fairly large centre piece was left while doing this. This was removed later.


After shaping and hollowing with chisels, the bowl needed a lot of sanding.  started with rough 60 grit paper...


...eventually moving down to finer grades of paper. This one is 120 grit


You can see various grades of paper in this shot
It is worth noting that the best paper for this is to use the tough sheets and pieces of belts and discs made for attaching to belt sanders and velcro-fastening sheet sanders. They are super tough and don't rip.


The bowl after a lot of sanding


I gave the bowl a final plish using emery paste on a piece of leather. This is normally used to polish and sharpen razors, chisles etc. It is a very fine grit in a paste.


It is also pigmented, so it added a nice richness to the wood.


After polishing...


Whilst the bowl was looking great, it still had the internal plug of waste wood needed to connect it to the conical support in the lathe tail-stock.

To remove this, I took the bowl out of the lathe and trashed this with a flat wood bit...


...then ground the messy stump down with a rough burr bit in the die grinder...


Once the majority of the central plug was removed, I popped the bowl back in the chuck and cleaned the interior of the bowl with the flat chunky chisel


After this, there was also a load more sanding.

Here it is staright out of the lathe...


And with the face plate removed - nice!


 The sanding left the bowl in its raw wood colour


 Some more polishing with the emery paste put back some of the richness.


Making toggles from the old elm tree

Here are some toggles I made recently for the blinds in our house.
They are made from elm. The wood for this came from a tree that was in our garden when we moved in, but subsequently died due to dutch elm disease.


In situ...


These were turned on my mini lathe. Here you can see the lumps of wood I used.  I had cut these off the timber I had previously converted from the tree. This has been seasoning in the shed for about a year, so was pretty stable. Elm is generally a strong and stable wood, so it is good for this.

The first job was to fit a spindle in one end to fit in the lather chuck. Here's the pilot hole being drilled.


A bolt was threaded into the pilot hole, nice and tightly. Clamping a set of mole grips on the bolt head is a good way to do this. Quick and easy.


Once in, the bolt head was sawn off with an angle grinder


...to leave the spindle.

You can just about see the burr that the grinder leaves. To remove it, I chamfered the end slightly, so it would fit smoothly into the chuck.


Then it was fitted into the lathe. The spindle end is on the left. the right hand end is held in place by a conical piece in the tail stock. This supports the wood.


You can see that one side of the piece is almost a finger thicker than the opposite side of the piece.

(You can also see the beetle tracks that came from the underside of the elm bark!)


While it was safe-ish to spin the piece like this under no load, it is not a good idea to try to start turning when the piece is this eccentric. The rotational balance of something this way off centre produces a lot of kick back when you start using the chisels, which could be enough to dislodge the piece. This is not good. It's also not great for the bearings of the lathe.

Here is a test spin I did, to see how off centre the piece was: eerrmmm, VERY!


So, using the arbortech, I trimmed the piece down roughly while stationary, until it was much closer to an even cylinderical shape. This made it much more stable when rotated and subsequently much safer.


All the chisels described here were especially chunky turning-chisel with long handles. Normal chisels are too weak for turning and may snap. Also long handles give much more leverage and make the cutting easier to control (and thus safer).

Incidentally, I made all these handles from scratch. the handles for them were also turned on the same lathe. The wood is, from left to right:
Ash, yew, ash, walnut, ash, walnut, yew.


Once I had the piece roughly cylindrical it was just a case of turning the piece down to an actual uniform cylinder. The first part was a rough pass. This chunky low profile gouge chisel is excellent for this.


The gouge strips the wood off quickly and easily, but doesn't leave a very straight edge...


...so once roughly cylindrical I swapped it for a similarly chunky, but straight-edged chisel.


This chisel leaves a straight edge, but it rips the grain and leaves it quite rough. So, while the piece was now cylindrical, it needed sanding smooth, starting with a coarse 60 grit paper.


After sanding with the 60-grit graded paper, I swapped to progressively finer graded grits until the cylinder was nice and smooth.
I also used a 120 grit paper, but obviously forgot to take photo of that!


Now the piece was smoothly cylindrical, I could mark out lines that indicate how long each toggle was. This is easy to do while spinning the piece, using a softish carpenters pencil.


Then the rest of it was turning all the toggles evenly to roughly the same pattern.
The darker lines were cut using a hacksaw. Here, I'm shaping the end-curve with an angled chisel.


Here are the toggles, all still attached as one spindle. You can see that the chisel cuts have left the newly formed shapes rough again.


Although it is not shown here, these needed sanding smooth as the spindle had previously. Again, this meant starting with rough 60-grit paper, then 80, 120. 240 and 400.

Once smooth, the piece looked like this.


The spindle was removed, again using the mole grips...


The waste pieces could now be trimmed off. I used my old tiny tenon saw for this. It is sharp and has very fine teeth.


A trimmed piece.


The individual toggles were cut off. This leaves a slightly rough edge.


The curvy ends were smoothed off using the filing sander in a vice. Any old sander would have worked for this.


The final finish was done by hand on 400 grit paper on a soft support. This helps the paper smooth more gently.


The final task was to drill the cord holes. Each toggle's internal hole needed to be narrower at the top end where the cord enters...


...and wider at the lower end, where the knotted end of the cord sits.


Here they are in situ on the bamboo blinds. The colour matches quite nicely.