The annexe is a separate room that can be sealed off to exclude dust etc etc.
To see the scale, here is the main shed before being extended, and after.

Looking out from the main shed with the door shut, it is completely separate.

With the door open.
The floor between the main shed and the annexe is continuous throughout.
This gives six metres of floor, if needed.

You get the idea...
Inside the annexe
This is essentially a 3 metre by 2.5 metre build-space with NO FIXED FURNITURE.It's is designed as a big open box for making shit in.
This is good...
In the picture below, the dark brown door (left of the mirror) is the other side of the original outer door of the shed seen above.
The mirror is actually also mounted on a door that can be opened if really needed. The right hand panel is also a door, but that is static and is just a wall, now...
oops

It is flooded with light from the french doors, windows and skylights...

It has MDF-padded walls to absorb random impacts (and insulate it)...
And plenty of power points.

The annexe is a self-contained extension to the main shed. The main shed retains its outer door, so that any mess and dust from works in here will not contaminate the other inner space. The left hand door is the new outside door.


Obscured glass panes in the french doors let huge amounts of light through. They are bolted top and bottom, because it is freezing out now, but they can be opened to let lovely spring, summer and autumn in later...

The skylights in the roof don't hurt either. Even with stored timber above head height, it is still really light and airy...


Flexible space
Having a plain box to work in means I can put a bench wherever needed. Maybe I'll have at the end...
Or maybe along the side...

The design is modular. The "bench" is a super-solid fire door. It is heavy enough not to flex so it can be popped onto these two folding steel trestles. Or if I need space for a 3-d build, it can be folded flat.
I also have vices, bench tools and so on, mounted on planks that can be added for a job if needed, or tucked away if space is more important.
Build
The annexe was built from reclaimed materials in the same way as the main shed, using pallets for the base and doors for the wallsFloor
The boundaries of the annexe were laid out using timber beams first,
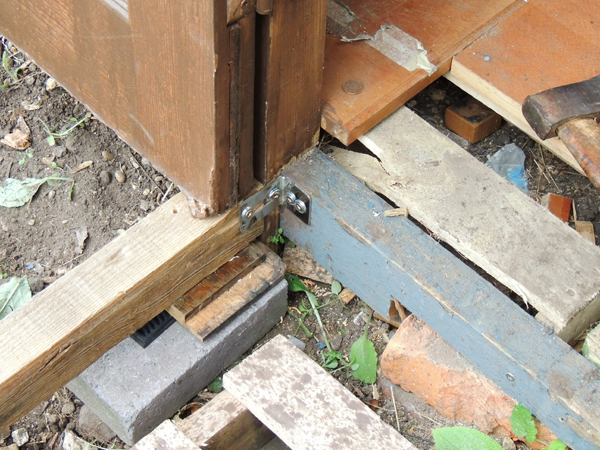
The new beams were attached to the existing floor beams with steel brackets made from reclaimed steel, scavenged from wherever. These brackets came out of a skip.
The wood does not rest directly on the earth. It is mounted on bricks to keep it off the damp soil.

Another joint made from whatever materials were found. Some sort of shelf bracket off some old furniture, I think...
Once the frame was in place, it was filled with pallets, as and when they could be scavenged...

Inner floor
Once the pallets were in place, on their brick foundations, the main floor could be laid atop,. This was extended from the existing floor of the main shed.
Looking out...

Eventually it ended up looking like this...

Walls
The fabric of the annexe is the same as the main shed. It is built from reclaimed doors...


Because they are pre-fabricated, you can peel them back if you need to change the construction.
Here, a few doors have been removed so a supporting upright for the roof could be bolted in...

...and here is the opposite beam, bolted onto the floor foundation frame...

Roof
The roof was built using timbers reclaimed from someone's old decking frame. Here, some temporary horizontal beams are in place to hold the emerging frame together (to stop it splayng out, basically)...

From another angle. The horizontal shown here was on the end frame and did remain. The others in the middle of the space were replaced by triangulated roof sections to keep the internal space open...


Once the frame was built, it was strong enough to stand on. It was then a matter of putting a skin on it. I don't have great photos of this, but the most significant point to note is that the central apex beam was first flanked with acrylic sheet, to form a fabulously light waterproof roof. The rest was filled in with MDF, with studs between the rafters as needed.

There are a lot of little beadings running along the beams etc., to support the flat planes.

The acrylic sheet. This was reclaimed from the Whales exhibition at the Natural History Museum - how very satisfying!


Felting
A good excuse to climb all over the roof....MDF is a bit crap, but actually, it is more than adequate for a roof base as long as it is supported. It is pathetically NOT water-proof though, so the felt had to go on ASAP...

There was a load of ad-hoc trimming

And some joints were sealed with pitch and chippings thrown on...


Part-way through. It's not that pretty, but it is water-tight.
You can see the hammer stapler used to secure it. A great tool. So fast.