It's that time of year again
Time to face just-about-tolerable levels of risk of physical danger from dodgy homemade christmas crackers. This year's "crackers" were actually christmas sacks, but with firework heads. Normally I'd make boxes, but sacks are much quicker to make and can be sewn to any size easily.
Each wooden head is a piss-takey caricature of one of the dinner guests. Each one provides the crack by firing off a decent bang using gunpowder. They are essentially cannons. This required a lot of carving, given we had eight people at dinner and two honoury guests absent, but attending in spirit (one of whom is a dog). Four of the heads had been made for previous years. This still left six heads to carve.

Action shots
These shots are from a smoke test I did to decide if they could be used indoors.
Pretty conclusively the answer was NO.


Making
All these heads were carved from semi-green wood.
What better raw material than a LUMP OF TREE...
The process for creating a head from a piece of log is, (more or less):
- Get log and cleave off piece of a suitable size for whatever you are carving. I used scavenged oak (hard and dense), birch (soft and light) and pear (somewhere in between).
- Depending on how green/wet the wood is, leave inside a dry shed for a month or five ( if really green and wet)
- Find a pic of the person you are basing it on
- Make some drawings of the person to get a feel of the shapes of the head (this is important - in your mind, you need to be able to see something like the finished thing)
- Work up a few final drawings to base the cutting on. These may need to include block-shape drawings that are not detailed
- Get log piece and hack down a square base for holding it securely in the vice
- Carve out block shapes of head. Typically using axes, rough saws, the Arbortech
- Re-draw details on block shapes
- Carve down to next level of detail, using die grinders with large burrs
- Carve down to next level of detail using small rotary multi-tools (Dremel scale) and micro burrs
- Sanding down increasingly fine grits and steel wool
The raw materials
Hey. Guess what. Wood is made from trees. Here are some logs from a felled birch tree. They were too big when found, so after getting them home, I sawed them to the right length and then split into blocks with an axe.
Prepping the wood for carving
Here's an axe-cut block. A freshly hewn block like this is always uneven because of the grain. This makes it hard to hold firmly enough in the vice. When carving, you need the wood to be secure.
The first thing to do was to make a square end for holding the block in the vice.
This was done with the Arbotech. I love my Arbotech. This is the wheel-shaped blade on this angle grinder. It cuts even oak like butter.

it

Another method is to screw on some square blocks to the base of the log...

Drawing
Before starting carving, I like to fix the image of the finished carving in my mind by drawing the subject several times. I do this by copying photos. Once a few drawings have been done, the image is sufficiently fixed to be able to distort it into a caricature. Having a conceptual target model allows me to carve out the shapes without always having to check back. Essentially, if you know what the the final shape is in your mind, you can carve away towards it.
Here's one.

They don't need to be perfect...


Roughing
Once familar with the shapes, the approximate block-level shapes can be drawn onto the log as a guide. These do not need to be too detailed. In fact they should NOT be very detailed. When blocking out it is not good to focus at the detail level.

Sketching out for roughing can be pretty minimalistic. At this stage, the big blocks of space are being formed.. Marker pen is good for this. It is hard to draw detail with a marker pen.

One of the trickier things is drawing flat drawings onto a 3D block. This requires a repeating process of carving and redrawing. As the shape emerges on the wood, this gets easier.

This is the first pass at roughing out a shape. This is a dog.

From the side, you can see the angle of the end of the muzzle starting to emerge...

Some time later. Note the redrawn guide lines...

Some more time later...

The blobs start to become more detailed...

Here's another one...

Because carving out the shapes cuts off the wood, the lines need to be repeatedly redrawn...

From the side too...

And the back...

Halfway through roughing out. It is always good to keep a rough sketch to hand to check the shapes.
Note that there are different details of sketch needed. Rough sketches are blob-level shapes...

More detailed sketches should not be used at the start, but are useful once the basic shapes are hewn...

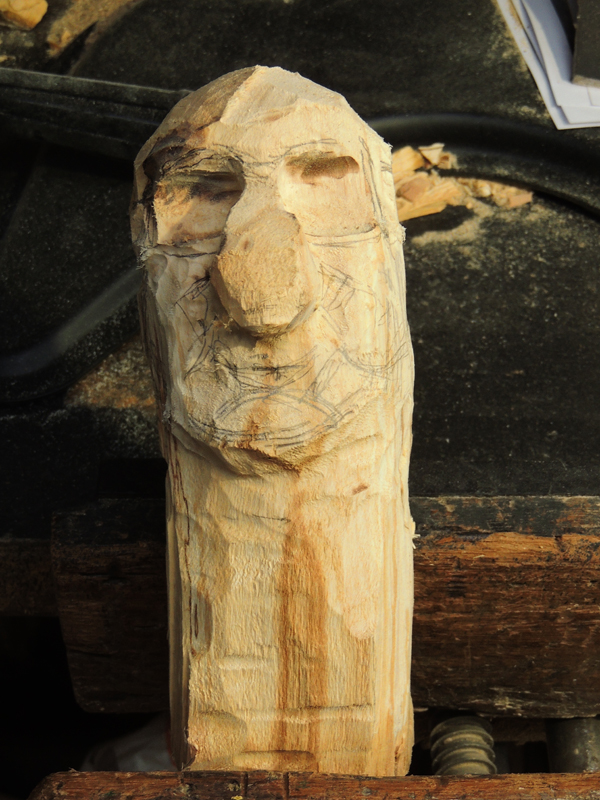
This head is starting to take shape...


This was needed to carve out the more subtle shape of the final nose...

Sometimes you need to check back to the source photo...

And just keep redrawing...

This is where having the final image in your mind helps to allow new guide lines to be drawn...


Another one...


Details
Eventually, the heads can be refined. This one is almost done for shaping out. It mainly now just need cleaning up and sanding etc....


Me and my son...


Smoke testing
I wasn't sure we could get away with lighting these indoors, so I did a dummy run top see how much smoke and flames they'd make.

Charged each head cannon with gunpowder pellets...

And set them up outside. In the shed would have been madness with all the sawdust in there!

No comments:
Post a Comment