Frankenbass! - my brand new fretless bass that I built myself.
I've wanted to build a bass for years. I finally got round to it.
In fact, I have thought for some years that...
a. it would be cool to build a bass from scratch
b. it would be interesting to try playing on a fretless bass
This build mashed up both of these niggling desires. I used my old Jazz copy bass. I kept the neck and head/tuning pegs and trashed the rest and built a new body from scratch from a nice hunk of mantlepiece. Although I kept the neck, I ripped out all the frets and re-faced the fingerboard with a combination of:
1. an old plant pot label
2. Superglue
Very satisfying!!
The bass was a 1970s Columbus copy of a Fender Jazz bass - not the greatest ever copy, but I have a soft spot for it, because I've had it since I was about 14, and I played it in some memorable gigs as a teenager (badly).
I set myself a few limitations on this build:
1. not to get too worried if I trashed the whole thing trying
2. not to overthink it, nor worry too much about it being super-perfect
3. have fun and treat it as a dry run for maybe building an entire bass from scratch in the future - body, neck, fingerboard, fretting - the works
In the end, it turned out really well. It looks great - has a really solid silky smooth and very heavy body. Most importantly - it plays pretty well.
This build has trashing and rebuilding an instrument, reinvention of a reclaimed mantelpiece as a guitar body, some tool-pimping to deal with the tricksiness of the job and an unexpected new appreciation for cyanoacrylate glue.
Some pics of the new bass...
There's a black/white and raw wood vibe going on here...
The freshly smoothed down fingerboard. The white markers are where frets once were...
The body used to be a mantelpiece...
It's Frankenbass!
Before it got reincarnated...
Here is the bass as it was, pre-revamp.
It was a bit fucked to be fair...
And filthy...
REALLY filthy...
I don't even want to know what this detritus was comprised of...
Part one - defretting the neck
First thing I did was take the neck off. This was easy enouth as it was just screwed on with four screws.
Then I just needed to defret it...
Sounds simple enough, but involved ripping out frets, then putting in new flush fret markers where they had been, and then essentially repairing all the damage caused and resurfacing the new smooth fretless fingerboard.
What could possibly go wrong?
To rip the frets out, I used a pair of end-cutter snips, to grap hold of them and ease them out.
But frets are very thin and sit close to the fingerboard. However the edges of the jaws of the snips were too crude to get hold of a tiny fret. The main mass of the fret only protudes from the fingerboard by about a millimetre. The bevelled edge of typical snips like these is more than a millimetre.
So, I just ground off the bevel on the belt sander, to render the jaw edges flat and sharp.
After a good grinding, the edges of jaws were now really flattened and slenderly pointed...
To help release the frets, I did two things:
First, I wet the wood adjacent to each fret, to soften it and reduce the risk of ripping out the grain as I pulled the frets out...
Then fret-by-fret, I heated each one up until it was really hot, with my soldering gun (400c+)
This helped soften or at least weaken, any glue that might have been used to set the frets.
Even if no glue had been used, the metal frets were wedged in good and proper. By heating them, they would expand slightly and so open up the slot ever so slightly, further reducing the risk of ripping the grain.
Here you can see the sorry pile of old frets after removal. The removal process was quite painstaking.
Next I cleaned up the slots. The frets have cross ridges (just visible as stripes - see above). They are there to help the fret keep firmly held in the wood. But removing the frets meant the slots had uneven edges where these ridges had been hammered into the wood.
I used a tiny saw to clean the slots up, and deepen them slightly. I had an old (but sharp) mini craft/trimming saw. This was ideal in that it was very thin and had lots of fine teath.
BUT it was way too long.
So, first I had to cut the saw in length. To be honest this saw has always been a bit annoyingly floppy as the back brace only extends about an inch and a half down the 7" blade. Cutting it down turned it into a tiny tenon saw - perfect!
Just right - the blade was now slightly shorter in length than the narrowest fret slot-hole
You can see the slots have a much lighter edge colour than the rest of the fingerboard. I decided to dye the whole fingerboard to make it a bit more evenly dark.
This is Parker Quink - a black drawing pen ink
After the ink dried, I sanded the surface back to the wood with a fine grit sandpaper (1200).
This did the trick - the slots, the ink made the rather ragged edges and the fingerboard face more consistenty dark. This mean the slightly ragged edges would be less much less noticeable later.
The whole fingerboard now looked like ebony. It's actually some darkish hardwood a bit like rosewood or mahogony (probably not actually either).
A fretless bass has no frets (duh!) and so requires much more accurate placing of the fingers. When you press a string down on a smooth fingerboard to control a note, the pressed string length is infinitely variable. To make it easier to use, I needed to glue in guide markers to show where the fret positions had been, so later on, I would have a chance of hitting a solid note, in key.
I originally tried making super-thin veneers of boxwood for this. I tried sawing thin strips, and then sanding them thinner. But this turned out to be really fiddly and it was almost impossible to make evenly thick veneers.
I needed to find something that was thin, a bright colour (ideally white), and with a consistently even thickness.
In an a-ha! moment. I happened to be tidying up the garden and came across a discarded plant label - a perfectly even, thin (<1mm thick) flat slab of pure white plastic (probably polypropylene or polyethylene, if I may be so preposteously illiterative).
Using this handy piece, I cut little curved frets out to fit each slot. You can see the picture of the plant, from the original label (just about).
I glued them in with superglue (cyanoacrylate).
I underestimated how runny the glue was (even though it was supposed to be the high-viscosity type).
It all got a bit messy...
Having got the slivers affixed in the old fret slots, there followed a LOT of clean up...
Not shown, but the first thing was to pare off the protuding plastic and glue with a chisel. This was quite a methodical job, as I really didn't want to slip and cut into the wooden fretboard.
This was the roughing down step. after that it was all about sanding down the grits, from 120 grit down to a 1200 grit, and eventually fine steel wool.
It is a little unnerving clamping your bass neck in the vice and sanding it down. It involved both hand sanding and a basic orbital sheet sander.
You can see some rather sloppy diagonal scratches here. These are probably 180 grit, so quite fine. They all need sanding out. Despite this, you can also see how unobtrusive the once-ragged edges now looked...
Part two - creating a smooth hard surface
Playing a fretted bass involves all the pressure of the string being on the metal frets.
I was concerned that once defretted, the original cheapish surface wood of the fingerboard was a tiny bit too soft so that when pressing strings against it without the protection of frets, it might get a bit mashed by the direct contact of the metal strings.
To mitigate against this, I coated it with several thin coats of cyanoacrylate (superglue). This forms a hard clear coating VERY quickly, as it dries in seconds. I applied about 4 coats, sanding smooth between each one. This involves a lot of sanding.
The sanding block here is a slightly concave piece of ash, with sandpaper tacked to it.
It starts roughish...
But after a LOT of buffing with fine sandpaper and eventually fine steel wool, it comes up as smooth as glass...
Below is my jar of emery paste, used on the final buffing. It is a type of thick hard waxy grease with really fine grit in it. I normally use it to finish the sharpening of chisel edges. It is also what is rubbed onto barber's strops - the long leather strips that are used to sharpen cutthroat razors. (incidentally, one meaning of having a strop, comes from the action of sharpening a razor)
I bought this from the much-missed Tirantis sculpture suppliers, back in the 1990s and it is still going.
Part three - revamping the neck and head
Now the fingerboard was a slick new flat surface with crispy clear fret-position lines, the rest of the neck looked a bit a knacked.
And so, I thought, I'd give it a revamp with a sand and new paint job.
Firstly, the nice new fretless fingerboard needed masking off so I didn't paint all over it.
On the head, I also did the tuning posts (the bit the string is wound round) and the string tree (the thing the two higher strings go under. The posts had collets round them, for finishing. I had removed these first.
This is Tamiya precision masking tape - used by modellers to mask fine details on trains, tanks, etc. It comes in small widths like 10mm and 5mm.
I also did a lots of sanding of rough old varnish/lacquer, then some matt black spray paint.
Nice!
There are about 6 coats of the black spray paint, and three coats of exterior varnich.
Part four- creating a solid wood block for the new guitar body
The biggest piece of woirk in this build was making a new body. The old guitar body was knackered.
The bass was a 1970s cheapish Fender Jazz copy (Columbus). The body was blockboard with a laminated face. It was about 50 years old and starting to come apart.
It was time to build a new one, but first I needed a big enough block of thick hardwood to carve the new body from...
Handily, I had a very chunky old hardwood mantelpiece in the shed. One of those things you scavange and store for years, wondering what you might do with it.
It's some indeterminate tropical hardwood. About 45mm thick (1 3/4 " or so)
chunky...
I only had a limited amount as it was not a huge mantel piece. To work out how to get enough wood from the piece that I could glue together later, I needed to figure out how I could cut it into shorter baulks.
I did this by trial and error, by tracing round the old body.
It was quite tight, trying to figure out how to cut diagonally, to eke out the available wood into lengths that could be glued into a block that was large enough to cut a new body from, to match the orginal.
This also involved some tracing paper and sketching freeform with a pencil.
Once I had the blocks cut to sizes I could work with, I then had to square and clean them up, so they were all exactly even in width and thickness.
This meant clamping them together and passing through the planer/thicknesser...
Before - slightly different widths
And a load of old varnish, obscuring the lovely wood underneath...
The grain is quite nice on this wood.
Much paler once planed...
After planing - all even widths.
Once all clean, lovely and square, they could be glued together.
There are no dowels or biscuits between the blocks. They are all just tightly square blocks, butt jointed with (exterior grade) PVA wood glue.
They were held with sash crampes for two days whilst the glue dried...
Here is the blank after glueing. I left it a week or so before sanding, to make sure the glue was properly set. One thing to note is that the lower parts of the block used pieces with the grain diagonal to the rest of the body. This was due to not having quite enough wood in the mantelpiece to cut these pieces with grain going lengthwise.
This was fine. Within the scope of the build I had allowed myself to go for a "make it work, but if it ain't pretty, don't worry about it" approach.
The whole point was to reincarnate a working bass from a wreck, and to see if I could create a working instrument, not to worry about perfection.
After sanding the completed body block, I was very pleased that it was quite hard to see the joins...
Part five - carving a new bass body from the wood block
Once I had a crude block, I used the tracing paper copy of the original layout to rough out where the final shape would fit within the block.
Tracing paper - so simple, but so effective.
With the pencil outline on the block. I roughed out the body shape, moving from crude chopping to a bit more finesse (not my strongest point, finesse).
Don't knock a good circular saw for hacking off corners...
For outside of convex shapes, they can be used like a router (with care).
For inner curves, forget it - it has to be a jigsaw.
Also crude, but very effective, is a belt sander with an 80 grit belt, held in a vice. Again, only really for outer shaping of convexes.
Masks are generally a good idea, here.
Eventually, a pretty good mutation of the original shape emerged. (The perspective here makes it look bigger)
Also, I didn't take photos, but for the inner concave curves, I used a filing sander (9mm finger sander), various die grinders with burrs and a router with a vertical trimming bit.
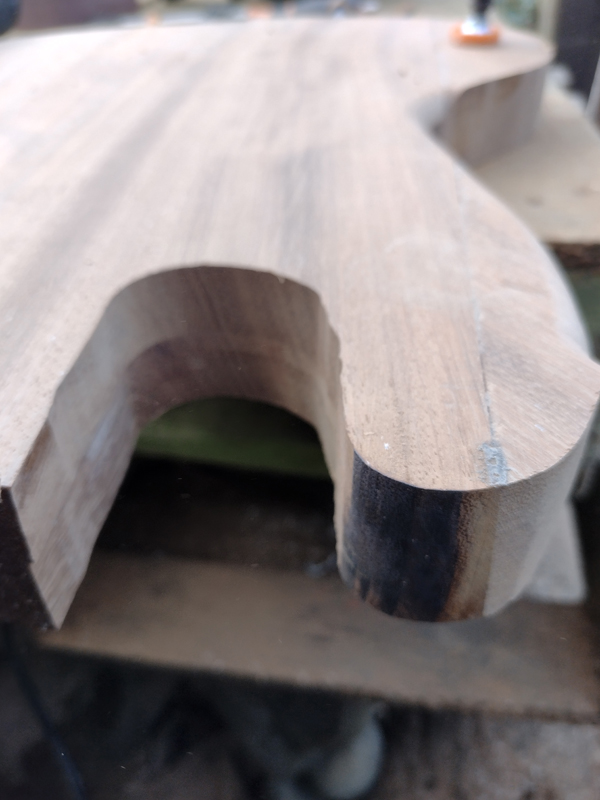
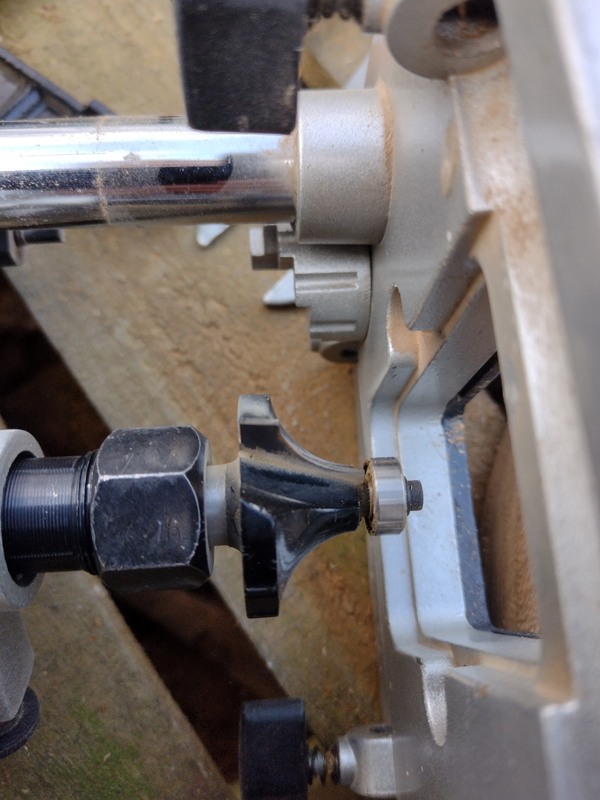
But no-one wants a hard edged bass, so I rounded over the edges with a router...
Before and after...
Now it was closer to the original. It wasn't exactly the same - I wanted to shape it a bit more individually later, based on how it felt in the hand.
Later, I would finesse the body shape further, but before I did that, I wanted to work out exactly how the neck would fit and where the pickups would actually be located. I did this first as the exact layout of these things could have affected where I added shaping for comfort, etc.
Part six - cutting out the recess for attaching the neck
To fit the neck, I needed to cut a deep recess in the new guitar body, so it could attach snugly. To do this, I used a standard plunge router with a straight cutter (3/8")
It it easy to veer off pattern with a router, so I first made a plywood template, so that I could follow the template and get a good even shape. I used a guide plate on the router base. This has a little protuding plug that you trace round the template, so that the edge of the cut matches the shape of the template.
The template was made by tracing a pencil round the end of the neck, then adding an extra 7mm or so that allows for the fact that the cutter cuts inside the template by about that amount.
Before risking cutting the recess in the guitar body itself, I did a test run on a piece of spare wood (you can see the grain of the cheap softwood.
It fitted!
The template was clamped to the body, to make sure it didn't move, while routing. This needed to be flat, so I improvised by screwing the template on top of the body, to a piece of the wood under the body, so it made a kind of sandwich with the body as the filling, locked in place. Once fixed, I also clamped the underlying wood to the bench.
Once it was in place, I double-checked the neck was going to be aligned to the centre of the body, by popping it in the template to gauge if it was in line properly. Then cut the recess. This was a moderately nerve-racking step.
Next up was attaching the neck, which meant drilling holes in the body in the exact same place they had been - another thing to check carefully.
To make sure the holes were exactly aligned to the old screw holes in the neck, I used the neck brace-plate as a template to mark out the relative distances of the holes to be drilled.
I drew through the holes onto graph paper, to make sure the holes were all correctly positioned relative to all the other holes.
I also aligned one edge of the graph paper aligned the matching edge of the neck itself, so the distances would be offset from the edges to match the neck.
Then I used a bench drill to make sure the holes were nice and perpendicular to the body.
This was checked lots of times before drilling :)

Then the moment of truth - I screwed the neck onto the new body, through the new holes...
The neck here is not fully tightened, so it is not parallel to the body yet.

Part seven- cutting out the pickup recesses
This was much fiddlier than I had expected.
Initially, I assumed it would be simply a matter of tracing round the pickups, just like I had done, round the neck of the guitar. I was feeling quite clever at devising a way to trace the shape AND add the extra room needed for the router guide, by taping a ball to a pencil to get a template for the more tricky shape of the pickups. Unfortunately, when I did this, I got a template easily enough, but when I used it, the shape was wrong.
Here is me tracing the pickup using the adjusted pencil...
It seemed to work well...

When I did a test cut, it was dreadful...
I couldn't be arsed to figure this out, so I used a much simpler method of cutting a rectangle, then cutting four circles inside it at the right distances so they made perfect nodes for the pickup shapes...
I used graph paper to lay out the new template.
The outer edge is wider than the hole (easy with a simple rectangle).
The position for drilling in the sem-circular recess lobes can be seen, marked with crosses. I used a spade bit to drill those. This picture is of a test-run on a spare piece of wood.
This approach made a neat hole that matched the pick up closely.
To work out the final position of the pickup recesses on the actual guitar body, I still needed to make sure they were in exactly the right place before attempting to cut the final recesses.
For this, I need to do two things.
First I needed to double-check the position of the holes in the scratchplate were exactly lined up with the new scratchplate I had bought...
So first, I needed to decide the exact position for where the scratchplate would sit on the body,..
And secondly, it was very important to make sure the plate (and therefore the pickup holes) would be aligned under where the strings would end up. I did this by using two pieces of wood to extend the neckline along the body so I could trace the exact place the strings would sit, later.
I now had an accurate position to place my router template, from the combination of the hole position from the scratchplate and the alignment guiderails I had drawn using my wooden battens.
I drilled the four hole first for each recess - another mildly nerve-wracking task
I checked the depth of these on the old bass to make sure they matched.

Note, the pencil lines I drew on the ruler so I could see the depth. This is much more reliable than trying to remember the depth measurement in your head.
This was important, because if I drilled too deep, I could have drilled right through the body!
Now the positions were set and the four holes drilled, it was easy to align the routing template for cutting the remaining part of the recess shape. The right hand hole is the cutting template here.
This routing was a simple now it was about following a rectangle.
The raw recesses...
I als made a recess for the pots, in a similar way. The required shape was much simpler shape so the template was easy. It is just a long rectangle, with circular ends, so it was just a matter of using compasses to draw two circles the correct distance apart, then drawing two lines between the outer edge of them.
The two pickup recesess and the recess for the electronics
One of the pickup recesses, after a lot of clean up...
Part eight - final shaping of the body
So far, I had been working on the body, with its shape almost finished, but not finnessed. Before I did the final assembly of guitar parts, I wanted to get the body really nicely shaped and polished smooth,
Although I had used a Fender Jazz body shape as a template, the Fender shape actually has some quite clunky curves on it. I wanted to improve the feel of the guitar, so that it would be enjoyable to handle. Musical instruments are tools and I am a big fan of using tools that are are pleasurable to use.
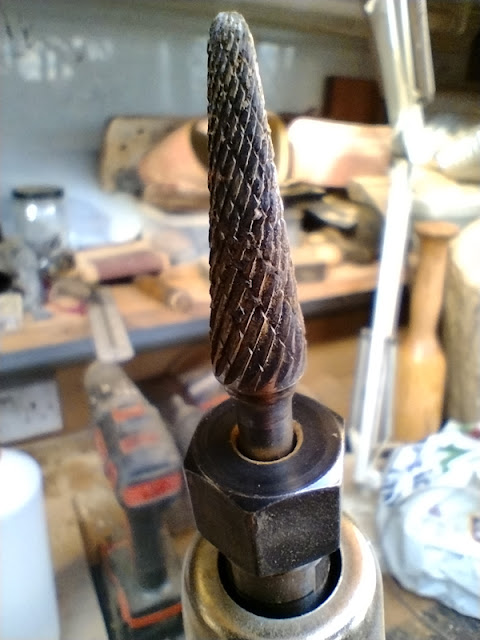
For this I used some of my trusty tools that I normally use for carving - a combination of die grinders and sanders. Die grinders are essentially like a very fast drill. I use them with fine-toothed rotary cutters. These are made from hard tungsten carbide, which can cut steel. For wood, they are excellent for shaping by eye.
The business end of a cutter. This one is a fairly fine burr. Good for shaping sweeping curves.
Also a range of sandpaper grits in the initial shaping. Later I used much finer grits for finishing.
Here I am making the horns of the guitar less like a crude rounded-off square shape, and more flowingly curvy in both dimensions.
The filing sander is also really good for this, when initially establishing the basic sweep of curves. This is a versatile, thin (9mm) finger sander (in both senses of the word if you are not paying attention)
Looking a bit more rounded in 3d...
After further work, a slightly cleaner sweep of the curve.
I also carved out a curve to the back lower edge, so that it was more comfortable to handle, e.g. when the guitar body is resting against the leg. You can just see the pencil line drawn to guide filing.
It was already rounded simply. The extra shaping was a shallow chamfering, to make it really comfy in this one area...
The filing sander. This is a Makita 9mm sander. The long flat belt allows quite subtle control.
Shaping in stages to rough out the basic curves...
When roughing out the shape, it is important NOT to start finishing until the basic shape is established. It should be about shaping, NOT polishing.
The big belt sander is good for evening out the curve.
The body curves are kind of the easy bit. Shaping the horns is more subtle.
Especially tricky inside the tight curves
This smoothig was done with the die grinder using a fine rotary burr...
A somewhat posed illustrative view of how this was done.
Some before and after shots showing the subtle enhancements in shape from old (Fender shape) to new (Frankenbass shape)
Old Fender form (top horn)
Much slicker new form. More like an Ibanez. Also, the grain is looking great here.
When dooig this, I like to handle a shape and use touch to check it, as much as sight to look at it. This shape just feels great in the hand.
The old body
And new. It is just curvier.
Part nine - finishing the body
There were quite a lot of finishing steps involved when finishing. This involved manual sandpapering using decreasing grits from 120 drawn to 1200.
As ever though, the final finishing needs steel wool. This cuts differntly to sand paper. It is much more randomly orientated. Sand paper essentially is a load of spikes that create lines in your wood and these need to aligned with the grain. Steel wool is more like shaving the wood as the strands are often perpendicular to the grain
The grain always just pops out when using steel wool...
As before, you don't just want to be looking at it. You need to fondle it. Fingertips are sensitive. Using them I could find the imperfections that my eyes couldn't see.
After much fondling and buffing...
Eventually, once super smooth all over, I applied about 6 coats of varnish. Look at that grain.
I didn't use anything special. It's standard wood varnish (outdoor). This is after about three coats.
After the first coat.
The grain is slightly iridescent.
Mind you, there were still a few imperfections - the dark areas here are where I had grain tear and just filled it. It looks a bit rough, but you can't feel it with your fingers. This is on the back of the body, so it doesn't really matter.
This is filled using superglue padded with very fine sawdust from sanding. You have to be very fast using this method!
This shot shows where there was a slight misalignment of the holes, that needed an adjustment to one of them. This got covered by the strengthening plate later.
Love the grain
Interesting on the curvy edges.
Nice!
Part ten - putting it all together
Now I had finished the neck and the body, it was fairly plain sailing from there on in. I just needed to bolt them together, then fix on all the hardware and connect up the electronics.
The first job was removing the masking from where I had painted the neck. I hadn't removed the tuning keys, because the tiny fastening screws had been set 50+ years ago and they were all solid. I hadn't wanted to risk mangling all the screw heads removing them, then also finding that loosening them might have made the holes looser.
Here they are masked, with paint all over the masking...
Taking masking tape off is never as easy as you hope. The tape I used was good quality modelling maskig tape, but after a month or so of being attached, the tack can get quite strong. I used scalpels to cut a clean edge to minimise tearing, and tweezers to pick off the masking tape.
I have felt under the neck here, to avoid scratching the face side of the neck.
Three tuning keys still masked, one with masking removed.
Even with the careful removal, the paint layer still occasionally pulls off an edge a bit more than you want...
This was the worst example - I touched it up later. Because these are on the back of the head, it is easier to disguise as you rarely view this side.
On the face side, I had removed the outer collets before masking. Only the pegs were masked, so I only had to remove the masking from them which was much easier to do without tearing. Once the pegs were clean, I refitted the collets and they covered up the edges nicely. The pegs in the background here are without collets. The black thing is a plastic tube, that I used to avoid damaging the collets, when hammering them back on. This was a hard plastic connector from a pool pump.
Collets all back on - looking good.
Even then, I managed to scratch the paint - I touched this up later.
The neck after removing the masking - looking really nice.
Then the satisfying milestone of bolting the two finished halves together. Sleek new black neck, meet curvy new wooden body...
Once the neck was on, I attached the scratchplate. I had bought a new one, I had found this online. It's a mottled black and white pattern, that resembles the glare pattern you get with polished chrome. The idea was that this would blend the black neck, black pickups and the black plate for the pots, with the shiny new chrome bridge and the chrome tuning pegs.
I had cleaned up these screws with steel wool first, to get them shiny too.
Some nice new pickups. I kept the old ones, in case I wanted to build some future monstrosity.
I had some fun and games getting these connection wires into the body. I'd already drilled the holes, before varnishing. This is easiest with a drill bit in a dremel. It gives you much more control for what is quite a fiddly job.
The wire holes could only be drilled at an angle as the recesses were so narrow. For the pickup, I drilled the holes from the elctronics recess, because the mounting plate for the pots would cover the recess and they wouldn't be seen. This was the highest point of the drill hole.
Then the hole would come out at a lower point in the pickup recesses, so they wouldn't be seen either, because although the pickups don't have covers, the holes would hidden by the pickups themselves.
A load of fiddly routing of wires - the green and yellow sheathing is to cover the earth wires that ground the bridge to the electronics control plate earth. .
Pickup contact wires being threaded. This needed care. The are quite delicate and I didn't want to pull them off the pickup by yanking too hard.
The pickups are Tonerider Jazz pickups. Some fancy scatterwound stuff, they say. I had considered making my own pickups, as they are really just wire coils round a steel core (inductors, basically).
But this felt beyond the scope I had set for the build. They come in a stylish box.
Once threaded, I soldered everything up again (carefully!)
I then just had to string up the bass.
I used round wound strings for this, as they have a brighter sound.
I had also added a Boris Karloff decal. This was a copy of the iconic toplit publicity shot for James Whale's classic 1930s Frankenstein film. It's alive!
In lo-fidelity close up...
This is simply a print out of the image, cut out, then lacquered on.
Conclusions
This was quite a complex build, with quite a few "not sure this is gonna work"moments
BUT, work it did and it was done over only about 8 weeks in fits and starts fitted around other things.
I was very pleased it turned out looking so good. It's a handsome beast
Most importantly, it also plays really well.
I'll add a future post of it being played.
 Frankenbass! - my brand new fretless bass that I built myself.