Tuesday, 29 August 2017

Blacksmith's tongs from scavenged steel

The great thing about blacksmithing is that you can make your own blacksmithing tools.
The last few times I've been attempting to do stuff, I have really needed some tongs.

And so, I made these...


Strictly speaking, they are gooseneck tongs. The curved bit presumably being the goose neck. Handy in case you need to hold a piece that has a head on it, larger than the bit being gripped.

Anyhoo, here's what this was made from. Scrounged steel discards from a lovely metal skip. Specifically, the lower piece with the loop in it...


But of course, the challenge with recycling is you first have to extract the materials from the stuff you find. In this case, the steel was surprisingly stiff. It took some battering to get a straight piece from it...


And some...


Eventually...


Tongs are symmetrical, so this bar was cut in half...


To render thus...


The bend points on the tongs were marked with a Sharpie, then beaten in with a cold chisel to form grooves.


The grooves were used to bash in bigger grooves on the anvil...


The two pieces were then heated in the furnace to red heat...


And a whole load of heating and beating on the anvil then occurred. I don't have many shots, but here is the first stage. The jaws of the tongs have been beaten out and the main curves of the tongs are being formed...


A load more heating then beating was needed. To keep it all focussed, a reference drawing is always a good idea. This one was Sharpies on veneer...


Anyway, lots of heating...


...and beating, produced the two tong halves thus...


Once the tongs were made, it was time to rivet them together. To do this, the two pieces were drilled where the rivet was needed.


Here is a test fit of the steel rod, to be used as a rivet.


To set the jaws, first a nut and bolt was used to see how things fitted together.


Once the jaws were more-or-less aligned, it simply remained to beat the steel rod into a dome-headed rivet, with a ball-pein hammer...


And here again, are the finished beauties.  Pretty crude, but they work amazingly well.


Monday, 28 August 2017

CLAMPOD!

If you like to take photos in tricky places and need a quick and dirty camera stand, then you need...

The CLAMPOD!


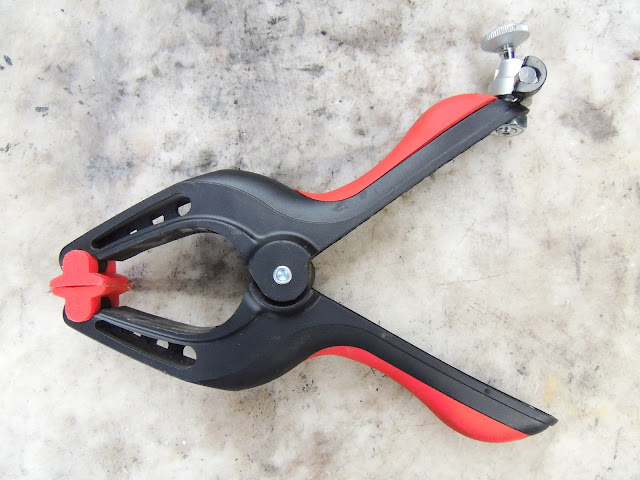
This is just a tripod head from a cheap micro-tripod...


Bolted onto a joiner's spring clamp...


These clamps have a ridiculously powerful spring and can be latched onto almost anything, like shelves, trees, etc.

Here it is on a post...


And an awning roof...


I have a gorilla pod that I use when setting up the camera for tricky blog shots, and in some cases, you can't beat its flexibility, but I suspect the clampod may replace it for many uses due to its superior grip.

Here's the gorilla pod. It's had a rough life, but is still going. The head is a mobile phone attachment, which can be handy. That comes off and will fit any standard 1/4" camera tripod screw.


Upgrading the furnace with ceramic wool

I recently discovered the awesomeness of ceramic wool.

This is a woven/fluffed mineral fibre insulation for containing heat. It's just like domestic loft insulation, but much less scratchy and irritant. It feels nice and soft like cotton wool, BUT it can stand absurd loads of heat without even discolouring. It is used in kilns and fireplaces to contain heat and, well, it's awesome!

Here is the newly insulated furnace looking like a lovely Christmas scene...


I recently cobbled together this furnace to heat steel for blacksmithing, It worked. Essentially it is a small metal box with lots of insulation, in which charcoal can be burnt to create a very high heat.

It used to have marble insulation with some horticultural vermiculite (because that was all I had).


I made the furnace to get a better heat. Previously I have done this on an open barbecue as a forge. That also works, but it is very inefficient and uses a lot of fuel.

Lovely ceramic wool

You can get this online from kiln and fireplace specialist suppliers. It is not especially expensive.


So fluffy...


wuffy...


First step was to measure the existing furnace box.


You can mark ceramic wool easily with markers - another plus.


And it is also really easy to cut with scissors.


With one mental eye on origami, eventually I ended up with a liner piece...


This was fitted into the furnace shell. It goes in fairly easily. I used a bit of steel lying about to tamp it into the corners. This was pretty easy too. It turns out ceramic wool is quite plastic and doesn't spring back. 


In close up...
The finished revamp - PIMP THAT FURNACE!


Wednesday, 9 August 2017

Whale pie

Picnic time favours pork pie and while snack-sized pork pies are all very well, sometimes you need a huge monstrosity. 

Well, here's one I prepared earlier... 

It is LOOSELY inspired by whales, although to be honest, that was just because someone made a random (and rather inspired) challenge to make a whale-shaped pie. (you know who you are)

And thus, I give you... WHALE PIE!
(disclaimer - this is only rather roughly anatomically accurate)


It is technically a hot-water crust gala pie (in other words, it's a pork pie with egg in it too.)


Mould making

A big pie needs a big mould. This is about 16" long and 4" high


To make this, I retrieved this lovely sheet of stainless steel from the dark depths of the shed. It is food-grade stainless steel and was previously a panel from a commercial kitchen, that I salvaged from a skip some years ago.


This was cut into strips with a large pair of tin snips...


Up close...


To yield two basic steel pieces (these are about 24" long)


Hammering out the shape

Any excuse to get on the anvil. The pieces were hand beaten to match a crudely drawn profile shape.


Half an hour later...
The drawing is just about visible.
The two halves overlap slightly so they can be rivetted together later.


Here it is after rivetting.


And finally, it needed a wash to clean it up.


Pie making

Moulds aside, the pie itself is a basic pork pie with boiled egg
This starts with a large pork shoulder joint.


2-3 kilos minced by hand in a manual rotary grinder. Not a light undertaking.
Not show here was another kilo and a half of cooking bacon, also hand-ground. This was seasoned simply with salt and black pepper.


Also required, a lot of eggs - boiled for 10ish minutes...


This takes a load of peeling, obviously. On the plus side, the shelled eggs are mesmerising.


The pastry is a basic hot water crust - half beef dripping, half butter, strong bread flour, water, salt.


Pie-construction

The mould was lined with pastry, hand moulded to a thickness of about 5mm.
Then a base of meat mix was placed as a bed.


An egg-based spine was inserted.
Note, the eggs were topped and tailed to ensure they kiss yolk-to-yolk.


This was filled up with the rest of the meat mix.


And covered with the rest of the pastry.


And trimmed and sealed.


Bake it

This hunk of tasty needed a load of cooking - three hours in fact. Here it is going in...
It was cooked on about gas mark 5.


Not shown here is that it gets turned halfway - avoidance of soggy bottom etc. Here it is some way into the bake. The glaze was built up by basting the pastry in the proteiny juices that exude.


Later in the bake, a pastry dorsal fin was added...


Hmm... more Godzilla than Balaenoptera musculus.


Mould removal

Baking a monster pie is the easy bit. Getting it out of the mould is a challenge in itself.


Not shown is steaming the mould with a kettle to soften the fat, coupled with some prudent parting of pastry and mould with a palette knife.

Thar she goes...


Ta-dah!
For scale, that is an 18 inch ruler


And a normal apple...


The final beast. Like a real whale, it is not subtle. Final cooked weight was about six kilos.