Showing posts with label reclaimed wood. Show all posts

Wednesday, 23 March 2022

Garden chairs from lovely old reclaimed bench-ends

 I love old-style park benches with ornate cast iron ends and slatted wood seats.

These beauties are two chairs I made by reclaiming some rather sorry bench ends and re-seating them with new hardwood slats.

I say new - all of the wood was reclaimed. Some from pallets and best of all, some was wood that used to be part of the Natural History Museum. Lovely old red mahogany-type hardwood baulks, which appear to be from the very early 20th century, although I can't be sure.


Here is one of them in the glorious sunshine. This one has face-on lion faces on the arms. These bench-ends are believed to be from a mid-20th century domestic bench. 


Lovely!


The other, in situ. These bench ends are either Victorian or Edwardian/early 20th century. They came from the Rock Park - a Victorian spa park in Llandrindod wells, wales.


Reclaiming the bench ends

The two chairs shown above came from two separate benches. One of these came out of a skip in the grounds of the lovely Victorian Rock Park in Llandrindod Wells. It was not possible to tell if these were original Victorian benches, but quite likely.

They were in a sorry state. You can see the left hand side has its lower end broken off. I had to go skip-diving to retrieve the missing end!


The wood was rotted and the cast iron frames were broken.


Here is one, after I'd wrenched off the rotten slats.


Leaving the bolts. The frame of this one has a support rail for the slats.


The bolts were seized, so I cut them all off with an angle grinder.


Leaving a lot of iron dust...


These cast iron ends had been damaged. 
Here the arm was detached from its decorative lion-shaped support.


And here, the lower end of one leg had been broken off. 
In this picture, you can see the leg end being clamped in position onto the remaining intact end.

This was in preparation for welding it back on


I used a basic arc welder for this. 

Here you can see the welding rod posed in position. The actual welding is too difficult to take a photo of.

Post-welding, the leg put back together.


The other set of bench ends came from someone who kindly donated it on Freecycle. These belong to their aunt. They just wanted them to live on.

Live on, they do!


They were a bit rusty in places, so I wire-brushed off the worst of it.


I think the steel was galvanised with zinc under the white paint. They were certainly not in very bad condition.


After wire-brushing I gave all the bench ends a base coat of black radiator paint. This is quite hardy. 


Gloves are advisable for this. Radiator paint is very hard to wash off.


I did all four ends.


Once the base coat was on, I then made the slats. These were ripped down from various pieces of hardwoods I had lying about.


The writing below is from the original builder. This wood is an old tropical hardwood. Maybe mahogany, but similar if not. hard, dense and even-grained.

I am not sure if the 01 12 is January 1912, 1 December, or even batch 1 of 12. Who knows. It came from one of the libraries of the Natural History Museum in London, which was probably early 20th century, so about 100 years old give or take a decade. 


The lighter slats are some unknown hardwood. They were from hardwood pallets, used for crating heavy fireplaces.

The sizes were cut evenly on a table saw (not shown) and then round using a rounding bit in the router (also not shown). The router was mounted in a bench and the wood presented onto to it. It is easier to control that way.

Here I have started bolting on the slats using coach bolts


Close-up of the bolts


Getting the two ends connected. These are the other ends. In this case, the slats are screwed on from the sides. There are no support rail as such, on these ones.


All slats on one chair


Once constructed, i sanded off any roughness on the slats, prior to painting.


And also on the chair arms.


A finished chair


Here are the chairs halfway through pointing them


The paint is green hammered-finish Hammerite paint. It is great for this. Very tough and dries pretty fast.

After the first coat, you always miss a bit!!


The two chairs drying after the second coat. I had rubbed back with steel wool in between coats, to smotth off and lumps from dust falling on the original coat, etc.


The two finished chairs in situ - they are every comfy. Wide enough for any single person to fit comfortably and also for two people to squeeze into if getting cosy (or one person and their bag, etc) 


Saturday, 15 May 2021

Retro boutique greenhouse from largely reclaimed materials

 This majestic structure is our new greenhouse. It is an irregular hexagon in plan. I love it.


The leaded lights are from the original door and side windows of our house, from c.1915. We had to remove them as they were no longer secure. It was great to see them back in a new life. I wanted it green, like the colour of old village cricket pavillions, which were always British Racing Green.

Here it is, showing off the new path spur that curves round to it (and a great brooding sky!).


I like curvy things. This path is very satisfying.

The above shots were taken before it was finished. This was before the final touches were added.
I am especially pleased with its finial. This was inspired by all the spires round Reading. It has a classy brass ball atop.


Close-up - it's majestic.


And creates a fine silhouette in the evening light.


Interior

In contrast to the lovely green exterior, I painted the interior white with emulsion for brightness. It reflects and diffuses the sunlight round the interior. This is the rear wall.


It can get up to 50 degrees in strong sunlight! As shown on this rather nice retro-styled thermometer


The angled roof is best seen from inside. In this shot, you can also see a large workbench that we got off Freecycle and carried back from Wokingham on the roof rack. It took three people to lift it. I built in the drawer.

The staging shelves are made from pallets.


The rear wall is on the right in the shot below. This is partly made from a neighbours old panelled side gate  and partly panelled with skip wood.

There is 240V mains for charging your phone etc. (in this shot, a bluetooth speaker!)


View of the main shed from the small diagonal corner.


View of the house, summerhouse and small shed through the leaded lights of the door.


Design

The design for this needed to mirror the 135 degree angles in the rest of the garden, not least because it created a diagonal frontage that both looked good, but also faced right into the morning sun.

The design is an irregular hexagon in plan.  To get my head round how to build this, I made a model out of good old skewers and tape.


The main challenge was working out how to span 3.6 metres without vertical props and also incorporating the varying roof angles.

All the glass was to be sourced from reclaimed double glazed window units that conveniently appear in skips all the time for free. They are square. The roof design included triangles. For those, I used acrylic. Some was left over from a Natural History Museum Whales exhibition. The remaining odd pieces I cut from a bought sheet. 


Groundwork

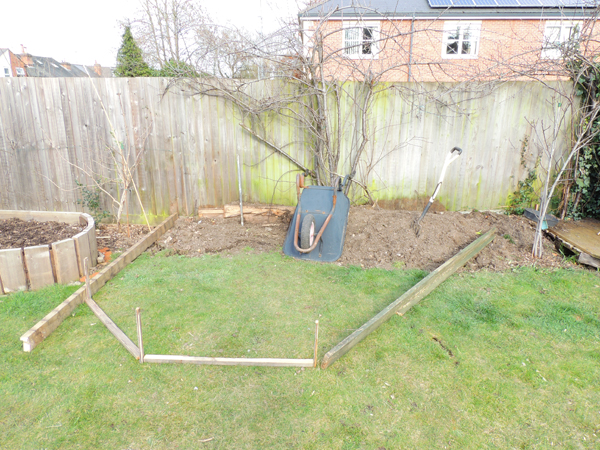
After extracting the design from my brain into a model, I then started building it for real at full scale. This started with the base frame. You can see the irregular hexagon shape of the footprint of the building. This is to allow the rear wall to fit tightly parallel to the border fence and the front rail is at a 135 degree angle to face diagonally into the garden.
  

The pegs were used to work out the level


Lots of digging. The tarp is there to keep the soil off the grass. 


I recycled all the top soild from the turf, by sun-drying it and beating it off later with a mallet, then sifting it with a riddle.


Lumps of turf drying


The ground levelled after a load of hard work.


Carcassing

The structure is supported by six uprights at each corner. These are 70mm square fence posts, secured using fence post metal spikes.


The front windows with rounded tops are sash windows from a victorian house round the corner in Hamilton Road, that was throwing them out


Cutting 135 degree angles is quite tricky

This is a view of the door frame from the inside.


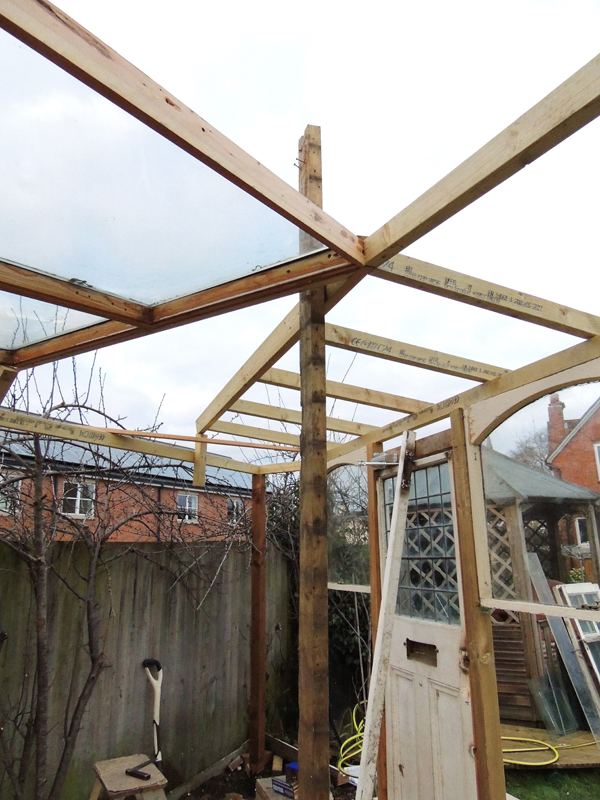
The roof lights are a mixture of frames from a wooden skylight (which conveniently had its own frame) and then built frames, in which I could glaze in other panes from old PVC double glazed windows.

Initially, I had to use a central prop to stop the frame collapsing (mainly when I was standing on the top of it).


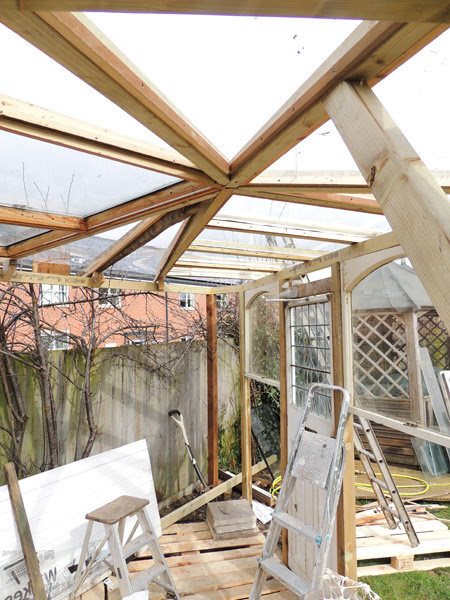
Under construction. The pallets at this stage were there to protect the lwan during construction. Later they became the greenhouse floor.

The large window on the left, behind the ladder is a single glass panel 1400mm x 1000mm This was a great find. It is an office glass table top. It is about 10mm thick!


Moving round to work on the roof...
On the right in thi spic, you can see some of the scrounged windows used.


The leaded ones are from the original windows of the house. The larger plain wooden frames are Victorian sash windows. The frameless panes are cut from the units inside UPVC windows.

Each double glazed unit yields two panes. I cut the round the plastic bezel that holds them together. This is handy, because you get two identical panes from each unit.


Creating the asymetrical roof ridge

I particularly like the pattern of the irregularly angled roof . Once I had enough rafters I created a central apex. This is jointed together with very big screws that act as pin joints. The rafters are set at a low angle (about 15-20 degrees). Because they meet in one joint, they support each other and spread the weight out to rails at the top of the wall frame and this is in turn supported by the six corner posts. 


I love it.


Here is a view from up a ladder, installing window panes. These ones are Velux skylights from a skip. You can see here that the floor is made of pallets. They are in their raw state here. I filled in the slatted holes later to make a solid floor.


Once the roof was up and sealed, then I had rain protection and could use the inside as a workshop to make all the rest of the frame. Some of the frame I made as a carcass. Quite a bit of it was built up using wooden window frames. These were just screwed into the posts. The top window in the shot below is hinged to provide ventilation.


The front taking shape

This was an epic build that took all of April. It was worth it. It is a lovely space to potter in o rjust read in the evening light, because it stays warm until quite late.