Monday 20 April 2020

Hover fly whispering

Hover flies are not just loveable furry flyers that brighten up the garden, they are also pollinators so they are very welcome.

Here's a beefly pollinating my pear tree...


But, did you also know you can coax some hover flies down to land on your hand? (NB - not beeflies, though).

For the ones that do, they will sometimes land on the end of a pointed finger if you put it up in the air near them.

Here's one on my hand yesterday. It decided not to land on my finger.


I had my finger out, but it wasn't having it...


This was the first time I had got one to land all week. You end up standing about the garden looking slightly odd by standing still pointing into the air. Must look weird from a distance.

Here are some shots of near-misses where the flies came into check my finger out, but decided not to land...


Spot the flies...


Saturday 18 April 2020

Curvy planter beds

I've just about finished (after like, more than a year on and off) laying all the brick path edges.

To date I have laid 737 bricks, all salvaged from skips or given away by kind donators.

I particularly like this twisty bit down by the shed as it snakes round the pear tree.


And to match, here are two new raised beds, recently built, ready for sumer planting. I like gently curving shapes. They are very pleasing and soften the feel of the space nicely.


From the side

I hadn't quite finished the brick edging in these shots.


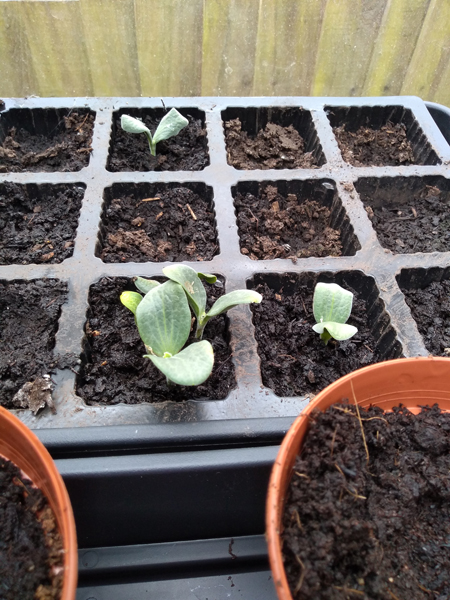
I'm using them as cold frames for now, with acryclic sheet laid on them to warm the soil and allow me to bed out a few tomato and bean seedlings.


It's not very clear but there are four tumbling tomatoes at the front and four climbing french beans at the top. Once it is warm enough to remove the acrylic, they should be bedded in well. The idea is the tomatoes will hang over the edge of the bed and the beans will climb up trained against the fence.


I have a few parsley and chive seeds in this , not under acrylic. They should be OK


Construction

The frames are ceiling joist cut into stout lengths and laid vertically. 
These are jointed together with screws that are not driven in right to the countersink head. They have about 10mm of play left in them, so they allow some movement, like a spine.


Then they are made rigid with internal panel linings.

This one has plywood. This will need to be lined to stop the ply rotting.


Using flexible steel panels is quicker as they won't need to be lined.


The limg straight edge on the left has acrylic as a liner.


The taller bed with the plywood internal panels was lined with a PVC tarpaulin, tacked in place with staples.


To form a large internal bag 


This did not need to be filled full-depth with soil as most plants it will house don't go very deep.

So, I reclaimed the concreate and tiles from this old fire surround to create hardcore.


Sledgehammering!


This filled about half the height, then was topped up with top soil.
I had accumulated this from digging out the rebates for the brick edging and other jobs and saved in a pile. The very top layer has two bags of rotted horse manure and straw dug into it for extra food for the plants

Thursday 9 April 2020

Gardening in lockdown

As we are all confined to our homes, much more gardening may well happen.

Like...

Making curvy raised beds.


This is made from reclaimed ceiling joists, jointed loosely to create a flexible and bendable shape. It's a bit like a tank track, or a spine. Each joint has a small amount of play in it. This allows the whole thing to be curved round the pattern cut into the lawn, while staying rigidly upright.

The bases of the wood pieces are plastered with pitch to stop soil moisture creeping up into them.


Once the curves were in place, steel sheet was bent round and affixed. This makes the slightly flimsily-jointed, spine-like wood suddenly super-strong. 


Rough-cut steel sheet can be sharp. Yet another slashed arm incident. This looks a bit like a face.


The back of the bed is straight. I ran out of steel sheet, so this is lined with some leftover acrylic sheet, previously scrounged from some skip


Winter is coming

Well, not just yet, but best to be prepared - make hay while the sun shines, as they say.

Anyway, gathering and chopping logs for next winter is a very enjoyable thing...

These are chuck-outs from a tree surgery. Various hardwood trees. Some are better than others. Some cherry, a bit of pear and I think some conker, but quite a few lumps are pretty vague.


It's a good excuse to get the chainsaw out, to cut them down before chopping with the axe.


PPE - always a good idea. Chainsaws can do quite a bit of damage, and so can the chips they  fling out.


Some time later, after a load of sawing, then even more work chopping with the axe, we have many many logs. I left them out in the Spring sun to dry them out.


Shed loft nursery

The upper reaches fo the shed get very warm, due to their big acrylic skylights. I cleared some shelves for seedlings. It is fair to say, they have responded enthusiastically. Things grow from seed to green plant in no time at all.

Tomatoes and butternut squash...


Courgettes...


Fabulous.

Last year's geraniums have been enjoying this warm hug of sunlight all winter. They will go nuts once they get out in the air.


And finally...

Here is a lovely furry friend in action: (Bombylius major) busily pollinating my pear tree. There's its furry arse sticking out of a pear blossom. It's probably off its face on nectar